
Disclosure: This post may contain affiliate links. If you purchase through one of our links, we may earn a commission at no additional cost to you.
Whether you’re buying a tiny house, working with a tiny house designer, or designing your own, knowing how to draw a floor plan will help you communicate your ideas and turn them into a real, workable design.
Getting Started
- Start the old-fashioned way. Most great ideas start out with a quick sketch on paper. But a drawing is most useful when it’s done to scale, allowing you to understand the size of elements and their relationships to each other.
- Graph paper makes it easy to draw to scale. Find graph paper with a not-too-dense grid, or print your own. Use a pencil, a pen, a magic marker, or whatever works for you.
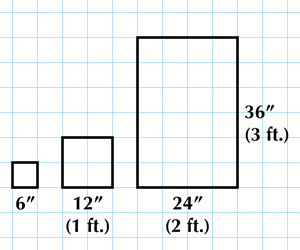
Using the graph paper grid - You’ll want each square of the grid to equal some easy fraction of a foot, like 3”, 4”, 6”, or 1′. Choose one of these (say 6”) and multiply it by the number of grid squares on your graph paper (say, 30×39). That gives 180×234”, or 15×19.5′ (divide inches by 12 to get feet). So, at that scale on that piece of paper, you have room to draw something up to 15′ wide and 19′-6” long. A 24” square table would be four grid squares long by four grid squares wide.
- Graph paper makes it easy to draw to scale. Find graph paper with a not-too-dense grid, or print your own. Use a pencil, a pen, a magic marker, or whatever works for you.
- Architectural drawing software. There are lots of software programs out there, some free, some cheap, some very expensive. While professional designers often use AutoCAD, you don’t need anything so serious. The same company offers a free, web-based floor plan design tool. If you have had good (or bad) experiences with other design software, please share it in the comments!
- SketchUp. A lot of tiny house designers have found SketchUp to be very useful. SketchUp is a free 3D modeling program that is not difficult to learn. With this software, you can design not only the floor plan but also the full three-dimensional design and details for your tiny house. Tutorials are available online, and Michael Janzen from Tiny House Design has done a very helpful video tutorial series on how to draw a tiny house on a trailer with SketchUp.
Knowing how big things are
- Don’t forget wall thicknesses. It’s easy to do, but if you leave out wall thickness in a tiny house, it adds up. If you don’t know exactly how thick your walls will be, guess. A typical 2×4 stud wall with 1/2” drywall on either side is 4-1/2” thick.
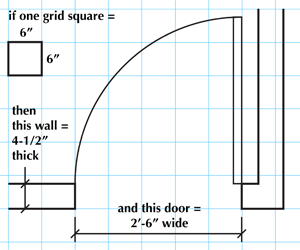
Drawing a door in a wall - Know your doors. Residential doors range in size.
- Doors range in width, usually in 2” increments (2′-6”, 2′-8”, and so on). The standard front door on new American houses is 3′ wide and 6′-8” tall, but this may be too wide for a tiny house. The old standard front door size was 2′-8”. Consider the size of your largest piece of furniture—will it fit in your chosen front door?
- Make sure to draw the door swing on the plan. Check that the door swing does not hit other doors, fixtures, or furniture. If you have a tight space, consider a pocket door.
- Doors near a corner should be at least 3-4” from the corner to leave space for trim.
- Know your windows. Draw your windows on the plan. Windows sizes vary. Common widths, for basic layout of a floor plan, are 1′-6”, 2′-0”, 2′-6”, and 3′-0”. If windows swing in or out, draw the swing on the plan. For more information on the types and sizes of windows (and doors) out there, look at manufacturers like Pella and Jeld-Wen.
- Be realistic about furniture. Furniture takes up space. Get out a measuring tape and measure your furniture, and yourself sitting in it. Or look online for a variety of “standard” dimensions.
- Understand kitchen dimensions. Kitchen base cabinets are typically 24” deep, with a counter that is 25-1/2” deep. Typical cabinet widths are in 3” increments (9”, 12”, 1′-3”, 1′-6”, etc.). Upper cabinets are typically 12” deep and come in the same widths. Ideally, at least 36” of work space should be allowed in front of the cabinets, with 42-48” being more comfortable.
- Understand bathroom dimensions. Building codes establish some guidelines that are helpful to know, whether or not you’re building to code. For instance, there must typically be at least 15” from the center of the toilet to either side wall, for a total of 30” between walls (although this will be a little tight for some people, who may prefer 36”). There should be 21” clear space in front of the toilet.

Special considerations
- Plumbing walls. If you have a plumbed toilet, the plumber needs to be able to run a vent pipe vertically through it, so try to locate it near a wall at least 2×4 if not 2×6, and preferably an interior wall.
- Shear walls. In a long, narrow house, side-to-side forces from wind and potentially earthquakes will put the most strain on the short end walls. Typically, the sheathing on those walls is what resists these shear forces, so try not to fill these walls entirely with doors and windows that reduce the sheathing area. Also, try to keep doors and windows a little away from each exterior corner, for extra strength (24” is great if you can get it).
- Passive solar design. Orientation and window placement are key aspects of passive solar design. Check out my post on passive solar from a couple weeks back for some tips.
Looking for inspiration?
- Look into small house books (I recently picked up Compact Cabins by Gerald Rowan and have found it very helpful) or free plans on the internet (such as Michael Janzen’s free tiny house plans at Tiny House Design) for ideas.
- Learn a little bit about feng shui. I don’t personally buy into (or even understand) all the depths of feng shui; that said, I’ve found it to be useful source of principles for home layout and design. About.com has an extensive section on feng shui. Take what you find useful, ignore what you don’t.
- Simplify, simplify, simplify. A simple plan is easier to build and may feel less cluttered. It can be made interesting and beautiful by vertical variation (window and ceiling heights and so on) and material choices, and I’ll talk about both of those things in the coming weeks.
Note: Last week I announced that this week’s article would be about insulation. While that is an interesting topic (at least, if you’re a building science geek), it’s not really specific to tiny houses—the same principles apply to all houses. If you were really looking forward to a thorough discussion of insulation this week, sorry to disappoint—but I’ll link to few resources that go into the various options in depth: an article on insulation materials from the Department of Energy
and another on thermal control in buildings from the Building Science Corporation.
Have you been designing your own tiny house floor plan, or are you not sure where to start? Share your designs, and lessons learned, in the comments below! Next week, we’ll switch axes and talk about the vertical dimension in tiny houses.
Disclosure: This post may contain affiliate links. If you purchase through one of our links, we may earn a commission at no additional cost to you.


Vincent Baudoin
Latest posts by Vincent Baudoin (see all)
- Small and Affordable: The 20K House Project - April 1, 2013
- Solar-Powered Tiny House Prototype: the LumenHaus - March 16, 2013
- Types of Tiny House Communities: Urban, Suburban, and Rural - March 7, 2013







Join the Conversation
61 comments