Two weeks ago, I wrote about the LumenHaus, a small, energy-efficient tiny house prototype by Virginia Tech. With its very high-tech features, it’s a neat example, but its $450-650,000 price tag puts it out of the reach of most of us.
But another university group has been focusing on designing small houses with a much, much lower price tag. That’s the Rural Studio at Auburn University.
The Rural Studio is a long-running design-build program that does most of its work in rural Hale County, Alabama. The Rural Studio’s 20K House project has produced a series of houses, twelve so far, so named because they’re designed to be built for $20,000. While some have met this budget and others haven’t, they are all interesting examples of simple but well-designed dwellings.
Take, for example, the Roundwood House. Its designers wanted to explore building applications for “thinnings”, small-diameter timbers that are removed to encourage forest health but are too small to be milled into conventional lumber.
[continue reading…]
{ }

Every year, designers (and design students) are dreaming up new ‘prototypes’ for various types of buildings, from prototypes for disaster-relief to futuristic green homes.
Some of these prototypes are quickly forgotten (and often deserve to be). Others live on, and some even become highly successful. Marianne Cusato’s “Katrina Cottage”, whose models range from tiny to medium-sized, was a prototype for post-hurricane housing that is now a common sight along the Gulf Coast.
This week I start a four-part series on tiny house ‘prototypes’ that are outside the tiny house mainstream (if there is such a thing). None has yet become as common as the Katrina Cottage, but each has some important lessons to teach, about which I will ramble, philosophize, and generally fail to come to any clear conclusions. (You have been warned.)
[continue reading…]
{ }

With the surge in interest in tiny houses, and the growth of a “tiny house community” online, there has been increased interest in the development of real-world tiny house communities.

Image credit: Four Lights Tiny House Company
Probably the most serious effort so far is the “Napoleon Complex” tiny house village being developed by Jay Shafer’s Four Lights Tiny House Company. It consists of 16-22 units per acre, with communal facilities including parking and a common house.
But people have many motivations for building tiny houses, and one model might not work for everyone. In this article, I talk about three general approaches to tiny house communities, and the pros and cons of each.
Rural life and tiny houses
For some tiny house builders, the countryside represents an escape from what they see as the overly restrictive requirements, and hectic atmosphere, of cities and towns.
[continue reading…]
{ }

Last week I talked about how to draw a tiny house floor plan. (A big thank-you to the many people who have contributed ideas and techniques in the comments!)
Most designs start with a floor plan — but the vertical dimension is what brings the floor plan to life.
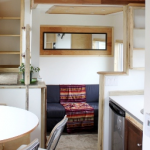
Take, for example, the McG Loft, by Humble Homes (pictured at right). Like many other tiny houses, its floor plan is very simple. It’s the carefully thought-out vertical dimension—the stair, the height of the loft—that sets it apart.
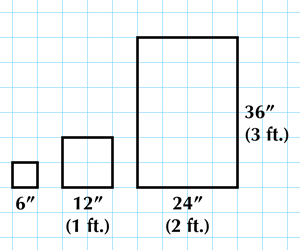
Knowing how high things are:
To get started, it may help to familiarize yourself with a few standard heights in houses:
- The most common ceiling height is 8′-0”. A ceiling 7′-0” or lower will begin to feel quite low.
- Standard doors are 6′-8” high.
- Standard kitchen counters are 3′ high.
- Headroom over a stair should be 6′-8″ or more.
There are many more ways to find information about heights and dimensions. For human dimensions, some information is available online or in books on architecture and space planning.
Of course, if you’re designing a tiny house for yourself, then you are the best source of dimensions. Grab a measuring tape and possibly a helper and you can figure out all sorts of things, like your most comfortable table height, your maximum vertical reach, your eye level, and more.
See below to learn how to draw elevations, cross-section, and 3D models of your potential tiny house:
[continue reading…]
{ }

Whether you’re buying a tiny house, working with a tiny house designer, or designing your own, knowing how to draw a floor plan will help you communicate your ideas and turn them into a real, workable design.
Getting Started
- Start the old-fashioned way. Most great ideas start out with a quick sketch on paper. But a drawing is most useful when it’s done to scale, allowing you to understand the size of elements and their relationships to each other.
- Graph paper makes it easy to draw to scale. Find graph paper with a not-too-dense grid, or print your own. Use a pencil, a pen, a magic marker, or whatever works for you.
Using the graph paper grid
- You’ll want each square of the grid to equal some easy fraction of a foot, like 3”, 4”, 6”, or 1′. Choose one of these (say 6”) and multiply it by the number of grid squares on your graph paper (say, 30×39). That gives 180×234”, or 15×19.5′ (divide inches by 12 to get feet). So, at that scale on that piece of paper, you have room to draw something up to 15′ wide and 19′-6” long. A 24” square table would be four grid squares long by four grid squares wide.
[continue reading…]
{ }

In last week’s article on passive solar design for tiny houses I briefly mentioned advanced framing and SIPs—two alternatives to conventional 2×4 stud framing.
Well, it turns out there are a lot of alternative framing systems out there. Why would you use one of them to build your tiny house?
In a lot of ways, conventional 2×4 stud framing is pretty awesome. This technology makes it possible to build houses quickly and cheaply. It’s flexible and can be used to create a wide variety of structures, including tiny houses. And it’s based on a standardized set of dimensions with which most other building products are compatible.
But conventional framing has some weaknesses, and the main one is that it’s not terribly easy to seal and insulate well, so it’s not very energy-efficient. That’s one of the five big factors we’d look for in an ideal framing system for a tiny house:
5 Factors for Framing Tiny Houses
- Insulation. Does it provide good thermal insulation and few air leaks?
- Strength. Can it stands up to the rigors of transportation, high winds, etc.?
- Weight. Is it relatively lightweight? (Sorry, concrete, you’re out!)
- Cost. Is the additional cost (if any) justified by the benefits?
- Ease of construction. Can it be built quickly, and is professional installation required?
[continue reading…]
{ }

Many people are aware of the concept of passive solar design, but it’s such a big and potentially complex subject that it’s easy to get overwhelmed or lost in a few details that are only part of the whole picture.
In this article, I’ll walk through some basic steps for applying passive heating and cooling principles to a tiny house design. As always, you’ll get the best results by doing as much research as possible and/or working with an architect or designer familiar with the principles of passive solar design (all architects should be, because passive solar principles can and should be incorporated into every building built!)
Let’s define what we’re talking about: Passive solar building design involves using windows, walls, and floors to collect solar heat energy when it is needed (usually in winter) and reject it when it is not needed (usually in summer).
Here are the basic steps to take when thinking about passive solar design:
Know your location
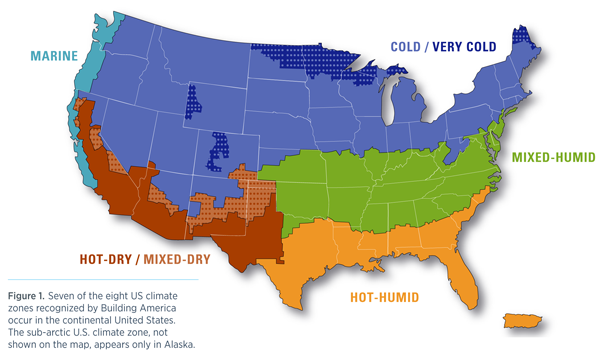
Step 1 is already difficult for some tiny houses—what if you decide you pick up and move your tiny house a thousand miles away? To design your tiny house, you’ll need to pick a location to design for, and know a couple basic things: your latitude (which determines the sun angles) and your climate region (which determines your passive solar design priorities).
Luckily, there is some good information on climate available online. The map below comes from the U.S. Department of Energy’s Building America Best Practices program, which also offers climate-specific building advice.
{ }
How is lighting a tiny house different than lighting a normal room of the same size?
A normal room can be treated as one, fairly unified, space. It is used for a limited set of purposes. For example, a dining room is used for dining and gathering.
On the other hand, a tiny house no bigger than many dining rooms may contain many diverse uses in one space. The lighting can serve to highlight these uses rather than making the house seem like one unified (fairly small) room.
If you’ve decided against unnecessary partitions, then lighting can create the feel of separate, intimate spaces without physically chopping the interior up into separate rooms.
There are two basic types of lighting to consider: daylighting and artificial lighting. Last week’s post was about daylighting; today, we’ll look at artificial lighting and the ways it can work for you.
Artificial Lighting for Tiny Houses

Photo credit: Tall Man’s Tiny House.
[continue reading…]
{ }
Lighting is one of the most important ways to define a space and make it feel comfortable and inviting.
It’s also an opportunity to indulge your creativity and individuality.
There are two basic types of lighting to consider: daylighting and artificial lighting.
Today’s post looks at daylighting and how to design a space to take advantage of the free, high-quality light from the sun.
Daylighting: Lighting Design for Tiny Houses
Daylight is a wonderful resource and you should use it for as much of your lighting as possible during the day.

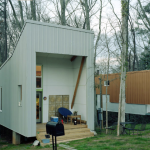
This tiny house, by Leaf House, uses daylighting to full advantage.
[continue reading…]
{ }