
Disclosure: This post may contain affiliate links. If you purchase through one of our links, we may earn a commission at no additional cost to you.
The Going Tiny Series, Part 23 of 45 · Guide 3 of 5: Tiny Without the Ladder
A free chapter goes up every day. See every part. Rather have it all at once, with printable worksheets? Get the Going Tiny Toolkit.
This is the chapter to keep beside you when you’re looking at plans. It walks through the home from the driveway to the bedroom and gives the dimensions that make a space usable. Most of these numbers come from the 2010 ADA Standards for Accessible Design and the ICC A117.1 accessibility standard. Those standards are written for public buildings and certain types of housing, not for your private home, so nobody is going to make you follow them. But they’re based on decades of research about what works for people using wheelchairs and other mobility aids, which makes them an excellent starting point.
Measure your own body and equipment
Standards are built around an “average” wheelchair and an “average” user. Your power chair might be longer. Your walker might be wider. You might need more space on your left side than your right. Measure your actual equipment (length, width, turning space) and measure the reach and seat heights that are comfortable for you. An occupational therapist can do this with you. Then verify for your situation.
Getting in: parking, path, and entry
- Parking spot: Make it firm, level, and close to the door, with room beside the car for a wheelchair or walker. Public accessible parking uses a 5-foot access aisle beside a car (8 feet for a van with a side lift) as a reference.
- The path: Firm, stable, and slip-resistant. Think concrete, pavers set flat, or well-compacted fine gravel, not loose pea gravel or grass. A minimum of 36 inches wide; 48 inches is more comfortable, and lets someone walk beside a wheelchair.
- Lighting: Motion-sensor lights on the path and at the door, so you never fumble for keys in the dark.
Ramps: the 1:12 rule and why it means a long ramp
Most tiny houses on wheels sit high, because the floor is on top of a trailer. A common entry is 24 to 36 inches above the ground. That height matters a lot if you need a ramp.
| Ramp item | ADA reference (verify for your situation) |
|---|---|
| Maximum slope | 1:12, which means 1 inch of rise for every 12 inches of run (gentler is better; many people find 1:16 or 1:20 much easier) |
| Maximum rise per run | 30 inches, then a level landing |
| Minimum clear width | 36 inches between handrails |
| Landings | Level landings at the top and bottom, at least 60 inches long; a 60 by 60 inch landing where the ramp changes direction |
| Handrails | On both sides when the rise is more than 6 inches |
| Edge protection | A curb or rail at the edges so wheels can’t roll off |
Do the ramp math before you buy
At 1:12, every inch of height needs a foot of ramp. A door 30 inches off the ground needs a 30-foot ramp, plus landings. That’s often longer than the house. Options: set the house lower (a foundation cottage can sit only a step or two above grade); use a ramp that switches back with a landing; regrade the ground so the path rises to meet the door; or install a vertical platform lift, which takes far less space but costs more and needs power and maintenance.
The landing and the front door
- Landing: A level porch or landing outside the door, at least 60 by 60 inches, so you can stop, unlock the door, and open it without rolling backward. A covered landing keeps you out of the rain while you do it.
- Door clear width: The ADA reference is 32 inches of clear opening, measured with the door open to 90 degrees (from the face of the door to the stop on the other side). A 36-inch door usually gives you that. Many tiny houses use 30- or 32-inch doors that give less than 32 inches clear, so measure.
- Room beside the handle: When you pull a door open, the ADA reference calls for about 18 inches of clear wall space beside the latch side so a wheelchair user can get out of the door’s way. In a tight entry that’s easy to forget.
- Threshold: Keep it as flat as possible. The ADA reference is no higher than 1/2 inch, beveled. Some exterior doors come with low-profile or “ADA” thresholds.
- Hardware: Lever handles, not round knobs. Consider a keypad or smart lock so you don’t need to fiddle with keys.
Want to do this on paper?
The printable PDF of Tiny Without the Ladder has fill-in worksheets for this step, including:
- Mobility & Daily-Routine Needs Assessment
- Space Must-Haves vs. Nice-to-Haves
- Bathroom & Kitchen Accessibility Checklist
They come with all five guides in the Going Tiny Toolkit.
Moving around inside: paths and turning space
- Clear paths: 36 inches is the reference minimum for an accessible route. 42 to 48 inches is easier for walkers and for turning corners.
- Turning space: A wheelchair user needs either a 60-inch circle or a T-shaped turn that fits in a 60-by-60-inch square (like a three-point turn in a car). Plan at least one turning space in the main living area, one in the bathroom, and one in the bedroom if you can.
- Knee and toe space: Turning space can overlap the open space under a desk, sink, or table if there’s room for knees and toes underneath. That’s one of the best tricks for small homes.
- Hallways: Avoid long narrow halls. If you must have one, make it at least 42 inches wide and avoid turns at the end of it.
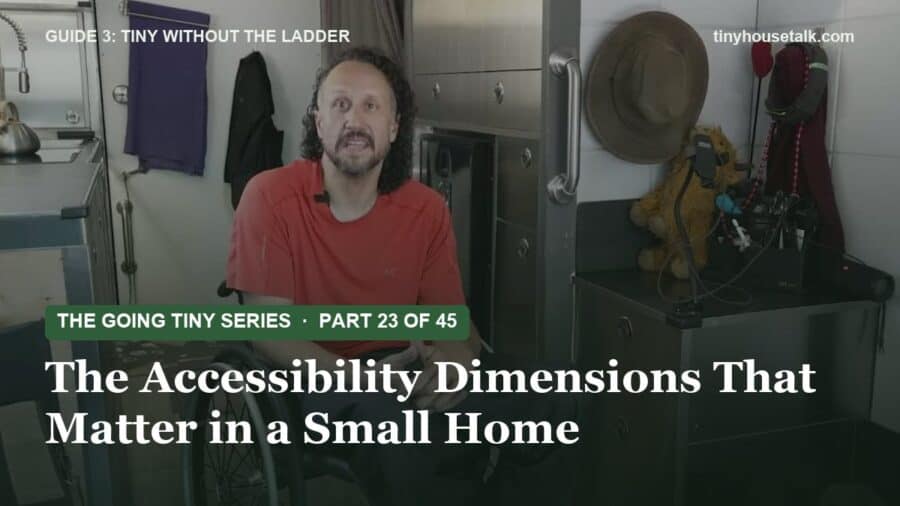
A real home from Tiny House Talk

Photo via Tiny House Giant Journey/YouTube
Ben built his box truck home around his wheelchair
After a skiing accident, Ben spent 18 months converting a box truck himself into a wheelchair-friendly home. The truck's extra width gives him room to turn his chair, and he added a drop-down ramp, accessible countertops, a roll-out cutting board, and an elevator bed. Width did the heavy lifting.
The bathroom: where accessibility matters most
Falls happen most often in the bathroom. It’s also where tiny houses tend to cut the most corners. If you spend extra money anywhere, spend it here.
Shower
- Curbless (roll-in) shower: No step or lip at the entrance; the floor slopes gently to a drain. A common reference size for a roll-in shower is 30 by 60 inches minimum; a 36-by-36-inch transfer shower with a seat works for people who transfer from a chair.
- The floor: In a tiny house on wheels, a curbless shower takes planning, because the drain has to fit under the floor without a step. On a foundation, it’s much easier. Ask your builder early.
- Seat: A fold-down shower seat, or room for a shower chair or transfer bench.
- Handheld shower: On a slide bar, so it can be used sitting or standing, and so a caregiver can help. Controls reachable from the seat, not just from under the showerhead.
- Anti-scald valve: A pressure-balancing or thermostatic valve keeps the water from suddenly getting too hot. Many people with neuropathy can’t feel heat well, so this one matters.
- Bathtub? Some readers need a tub for pain relief. Walk-in tubs exist; so do transfer benches for regular tubs. Ask a therapist which is safest for you.
Toilet
- Height: A “comfort height” or “chair height” toilet puts the seat around 17 to 19 inches from the floor, which matches the ADA reference. Standard toilets are often around 15 inches.
- Placement: The ADA reference puts the center of the toilet 16 to 18 inches from the side wall, so there’s a wall close enough for a grab bar.
- Clear space: Leave room in front of and beside the toilet for a wheelchair transfer or a helper. Even if you don’t need it now, this is hard to add later.
- Composting toilets: Many sit higher than standard toilets and need to be emptied regularly. Ask yourself, honestly, who will empty it on a bad day.
Grab bars and blocking
This is the single cheapest, most important thing you can do during construction. Ask your builder to install solid wood blocking (extra framing) inside the bathroom walls, wherever a grab bar could ever go: beside and behind the toilet, all around the shower, and beside the tub. It costs very little while the walls are open, and it means you can add grab bars anywhere later, screwed into solid wood.
- The ADA reference mounts grab bars 33 to 36 inches above the floor.
- Next to a toilet, the reference is a 42-inch bar on the side wall and a 36-inch bar on the back wall.
- A vertical bar at the shower entrance helps people step in and out.
- Towel bars are not grab bars. They will pull out of the wall.
Sink and the rest
- A wall-hung or open-front sink with knee space underneath, with pipes insulated or covered so they don’t burn legs.
- Lever or touchless faucets.
- A mirror low enough to use while seated, or a tilting mirror.
- A door that swings out or slides, so someone who falls against the door can still be reached.
- A good exhaust fan on a humidity sensor (wet floors are slippery floors).
The kitchen
- Counter height: Standard counters are about 36 inches. The ADA reference for a work surface used by a seated person is no higher than 34 inches. Some people do best with one section of lower counter with knee space underneath, and the rest at standard height. Adjustable-height counters exist, too.
- Reach: The ADA reference for an unobstructed forward reach is between 15 and 48 inches above the floor. Keep the things you use daily in that range.
- Drawers and pull-outs: Full-extension drawers and pull-out shelves in base cabinets instead of fixed shelves.
- Cooking: A cooktop with controls on the front or side (so you never reach over a burner). An induction cooktop has no open flame and the surface cools quickly, which many people find safer. A wall oven at counter height, or one with a side-opening door, means no bending over a hot oven door.
- Dishwasher: A drawer-style dishwasher, raised off the floor, is easier on backs than a full-height door.
- Fridge: A side-by-side or French-door fridge with a freezer drawer at the bottom keeps most food within easy reach.
- Microwave: At counter height or in a drawer, never over the range.
Switches, outlets, and controls
The ADA reach range (15 to 48 inches) is a good guide for controls. Many universal-design builders put light switches around 42 to 48 inches and outlets at least 15 to 18 inches above the floor, instead of right near the floor. Rocker switches are easier than toggle switches. Lighted switches help at night. Put the thermostat, breaker panel access, and water shutoff where you can reach them from a seated position. Voice-controlled or app-controlled lights and thermostats can be a real help, too.
Floors and transitions
- Choose firm, smooth, slip-resistant flooring. Luxury vinyl plank, sealed concrete, and low-pile commercial carpet work well. Thick rugs and loose throw rugs are trip hazards and are hard to roll over.
- Keep transitions between rooms flush. If there must be a change in level, keep it to 1/4 inch, or 1/2 inch with a bevel, per the ADA reference.
- Avoid single steps inside the house. One small step is easy to forget and is a common cause of falls.
Light, color, and contrast for low vision
- More light, less glare. Layered lighting (overhead plus under-cabinet plus task lights) and matte finishes rather than shiny ones.
- Contrast. A counter that contrasts with the floor; a toilet seat that contrasts with the toilet; stair edges marked. Light switches that contrast with the wall.
- Night lighting. Motion-sensor night lights along the path from bed to bathroom.
- Windows. Daylight helps everyone see better. Choose window coverings you can operate easily, such as motorized or cordless shades.
Sound and alerts for hearing loss
- Smoke and CO alarms designed for people who are deaf or hard of hearing use a strobe light, a bed or pillow shaker, or a low-frequency sound that’s easier for many people with hearing loss to wake to. Ask your local fire department; some offer them free or at low cost.
- Doorbell and phone signalers that flash a light.
- Text-based communication. Make sure you can call for help by text. Text-to-911 is available in many areas but not all, so check with your local emergency services.
Your turn
Loft or no loft? Tell me what your knees (or your heart) say in the comments.
Like to print things out and write on them?
This series is free to read here, and it always will be. If you’d rather have it as five clean, printable PDFs, that’s the Going Tiny Toolkit:
- Tiny Without the Ladder (the guide this chapter comes from): one-level layouts, real accessibility dimensions, and the bonus One-Level Floor Plan Idea Book
- The Tiny House Money Plan
- Where Can I Put It?
- Bringing Them On Board
- Your First Tiny Steps
Every guide adds printable worksheets and a 30-day action plan, and Tiny Without the Ladder comes with the bonus One-Level Floor Plan Idea Book (18 to-scale floor plans). All five are $47, with a 30-day refund.
← Previous: Part 22: Tiny House Lofts: Stairs, Ship's Ladders, and the Honest Truth
Next (tomorrow): Part 24: Tiny House Safety: Egress, Alarms, Falls, and Care Nearby
Not sure which part matters most for you? The free 10-minute What’s Really Holding You Back? quiz tells you where to start. And to get a new part (and a new home) in your inbox each day, join the free Tiny House Newsletter.
Disclosure: This post may contain affiliate links. If you purchase through one of our links, we may earn a commission at no additional cost to you.


Alex
Latest posts by Alex (see all)
- The Accessibility Dimensions That Matter in a Small Home - November 10, 2026
- The San Juan: A Tiny House Builder’s Own Off-Grid Dream Home With an Elevator Bed and Penny Floor - November 9, 2026
- Koleliba: Bulgarian Tiny Houses Designed for Slowing Down - November 9, 2026














Join the Conversation
No comments yet. Be the first to join the conversation.