I find it unbelievable that, after submitting my first tiny house article last month, I have received hundreds of personal emails from all over the world, connecting me to THOW enthusiasts who have asked some intelligent, positive questions. Many wanted some additional photos and construction details about my tiny house innovations … others just wanted to share their joy.
To my many new friends, I offer the following article, along with my solidarity, gratitude, and sincere thanks.
How I Designed/Built a Lightweight THOW

Insulation, smart framing, weight reduction, SIP’s, building costs, design, energy saving, recycling, innovation… each tiny house builder has different goals, different styles, different needs and different values – I’ll share my personal favourites:
Framing and Insulation
After my first story was published, a lot of folks asked me about my unusual framing and use of insulation. It will be helpful to scan the previous article and photos to more fully understand this more technical article.
In designing my Tiny House, a major consideration for me was insulation – both for heat and for cold. I live in Grand Forks, British Columbia, Canada – an area of temperature extremes.
No Heat Los = No New Energy Consumed
I value insulation as an effective approach to reducing both my carbon footprint and my energy budget. No heat loss = no new energy consumed = my retirement savings plan.
My theory of minimizing heat loss revolves around creating a continuous, unbroken envelope of insulation, and severely reducing any air leaks, penetrations, and thermal bridging.

Making Your Tiny House Construction Methods Energy-efficient
Relating this theory to energy-efficient, tiny house construction: Each stud removed from exterior wall assemblies, and replaced by insulation, improves overall r-value. Any insulation placed between the stud face and the exterior/interior face of the wall reduces heat transfer. The blue insulation placed over and under the insulated floor framing in the photo above serves this purpose.
Reducing Your Wall Studs While Keeping Your Structural Integrity
In my effort to reduce the number of wall studs required for structural integrity, I have supported my roof on a beam that is fully supported by posts that remain totally within the interior space of the trailer, therefore leaving no opportunity for these large framing members (the support posts) to wick heat to the outside. The exterior walls that would normally be engineered with the appropriately-spaced studs required to support the roof, no longer have that particular structural responsibility.
One of the reasons builders adhere to a standard stud spacing (12″, 16″, 19.2″ and 24″) is to allow the efficient use of standard building materials with as few cuts, and as little job-site waste, as possible. One of the other reasons (not being debated at this time) is the structural ability of the wall assembly to support roof loads.
I determined where my doors, windows, and upper kitchen cabinet rails would be attached and I placed a single 2X4 stud at those locations. I did not consider maintaining any standard stud spacing because the tiny house wall assembly is relatively small, and any waste from cutting my sheets of plywood, drywall (sheetrock), insulation panels or exterior sheathing on-site would be minimal.

Sidenote: If I use words in the following description that you’re not familiar with, please Google ‘standard house framing terms with pictures’ for definitions. While you’re at it look up ’Smart framing’.
Construction
Building my two, long sidewalls I used a single top plate, no jack studs, no headers, saddles (sills) or cripples. And in some places, such as between wide windows and the top plate, I would leave open spans of over 3 feet without any framing at all. Take care that there is adequate framing for drywall attachment. Remember that the rigid insulation panels will provide some backing strength for drywall. Over unusually wide spans I apply drywall adhesive to the insulation panels at intermediate spacing to assist rigidity.
Lightweight Framing for Windows
Because there was no supported load to consider, I used a 1X6 frame for the windows and attached them directly to studs – no cripple stud, header or sill. Being aware of this framing method, you can now imagine how much weight I saved and how much less thermal bridging and how much more insulation area I gained in the side walls.
End Walls
The two end walls were structural ‘bearing walls’ for the roof joists and therefore, I used standard framing practices.
Side Entry
As a design consideration, I think a side entry allows much greater design freedom and can help to avoid those traffic jams associated with long, narrow spaces.
Bathroom, Walls, and Desk
My interior bathroom wall was constructed as a ’shear wall’ using plywood sheeting as opposed to drywall. The 4 pony walls (each side of desk) are also structural ‘cross-bridging‘ to support the posts and/or exterior walls. My shear walls are made of 5/8” plywood, glued and screwed at all 2×4 framing members. No nails were used anywhere on my tiny house, only screws.
Using a Shear Wall to Strengthen Your Tiny Home
A ‘shear wall’ is a stiffened wall, capable of transferring lateral forces from floors and roofs to reduce lateral movement of exterior walls – a very important design consideration in a home that sits on a trailer.
Drywall Installation
I completed building and erecting the four exterior walls and then applied drywall to the entire interior, before installing those interior ‘shear walls’, thereby attaining a continuous lining of drywall for fire protection with very few cuts required.
Electrical, Propane, and Water Lines
I ran all my electrical, propane and water lines on the interior walls (mostly hidden behind cabinets or desktops) and provided appropriate mechanical protection for any electrical lines that could be exposed. This allowed me to maintain the integrity of the building envelope without service penetrations through the insulation.

Insulating Your Tiny House
I carefully cut three-and-a-half-inch thick, IKO Enerfoil, foil-faced rigid insulation (+R-6 per inch) panels to fit snugly between the studs (incidentally offering a very slight structural benefit) and then ran 2” blue styrofoam panels (r-9) at right angles to the studs to provide the thermal break from the studs. As overkill, I taped all the insulation/framing joints with red, cellophane Tuc-Tape to inhibit air and moisture transfer.
Siding
I used engineered, structural LP siding on the exterior, attached with screws and glue to all laps, strapping and framing components.
R-Values
Various internet sources quote various r-values for the materials I used, but I’m guessing I have a minimum R-30 in floor and walls. 2014 BC Building Code requires a minimum R-17.5 value in walls.
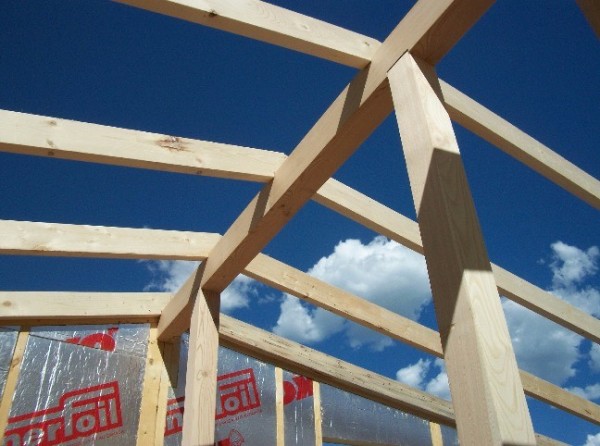
Roof Beam and Posts
My roof loads are fully supported by the beam near the middle of the house, and the end walls. The posts supporting the beam are 16″ inside the insulated building envelope, bearing on the strongest part of the trailer above the wheels. This bearing was strengthened on the frame and the floor during initial construction – as seen on ‘trailer floor’ photo above.
Moving the posts 16″ away from the walls allows the use of a smaller dimension beam to adequately span the distances and allows the full beauty of the posts and beam to shine.
Note: I am not a structural engineer and do not have the professional qualifications to specify any structural loads, code requirements, spans, dimensions or materials. If you are not an experienced builder or if you have any doubt about what you’re doing, call your local structural engineer, building inspector or licensed architect – I’m not him. If you or he thinks that my ideas and creative innovations are rubbish, then please follow your instincts.
More On Roof Construction
My roof is constructed using 2X6 joists @ 2’0″ on center, each attached outside the end walls with hurricane clips. I also used 14-guage hold-down straps over the joists at the ridge. A 2′ cantilevered overhang protects the trailer tongue deck. Intermediate joist support is provided by a beam and a wall.
Insulation in the Roof
Insulation is 5 1/2″ IKO between joists and 1 1/2″ styro at right angles for thermal break.
Corrugated Steel Roofing
I used factory-cut, galvanized, corrugated steel roofing for ease of application, longevity, fire security and summer heat reflection.
Corrugated steel is also a perfect roof for capturing and directing rainwater:
PVC Pipe Eavestrough
In place of a standard eavestrough, I cut and removed a 1″ strip along the length of a 2 1/2″ PVC pipe and I slid it onto the corrugation and it holds by it’s own clamped friction. I cap one end and glue an elbow onto the other end, which attaches to my downspout. I find that large debris are much less likely to be funneled into my rain barrel, as most of the snow and debris simply slides over this smooth surface – while even copious amounts of rainwater are neatly channeled with no overflow. If I ever do need to clean it out, it will just slip off.

Tips on Reducing Weight in Your Tiny House
Common questions have been, “How much does it weigh?” and “How much did it cost?”
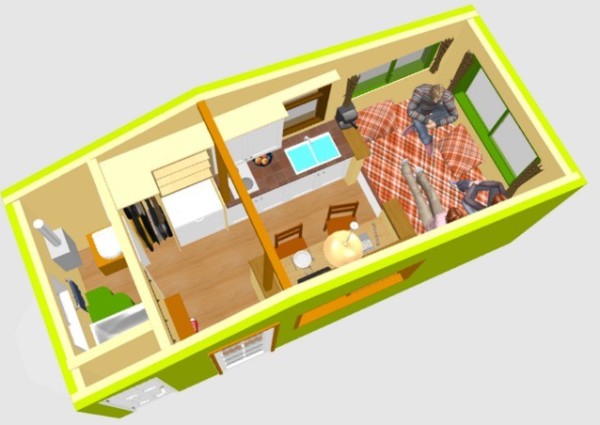
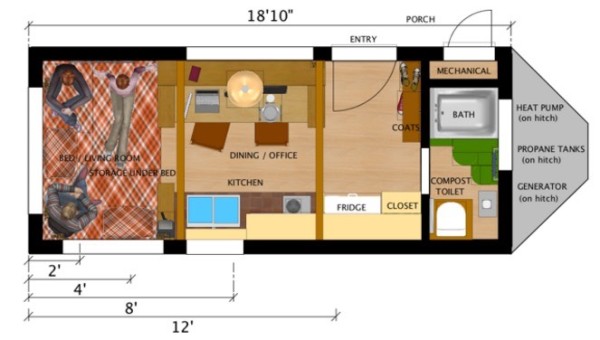
I have not taken my tiny house to a weigh-scale so I don’t have even a vague idea of what it might weigh. Apparently, neither does my little Jeep as it tows the load happily. Of course, each foot adds weight, so the first step to saving weight is to reduce the size. My house is 125 square feet inside.
My 5’6” long desk is my drafting table, office space, dining table for two, food prep area, workbench and library. It works well, as I’m never needing to do any of those tasks at the same time.
I saved a lot of weight and lumber with my framing strategy. The simplicity of the shed roof framing, and my elimination of a loft, severely reduced the top-heavy weight of some tiny houses.
I notice that a lot of tiny house builders use a lot of wood, often tongue and groove, on the interiors and exteriors. This material is quite heavy compared to the lightweight drywall (gypsum board) which I used on all my interior walls. I prefer drywall for it’s lightness, but also for sealing the envelope, the fire rating, the low material cost and low installation cost …and it’s flexibility to easily fit complex shapes.
I love wood ceilings and can justify that weight by the warm feelings they inspire (we all have our compromises). The majority of the dimension wood I used was locally grown and milled at Son Ranch, within 15 miles from my site.
Whenever possible, and reasonable, I use my ‘100-Mile Housing’ policy:
Inspiration for Greening the Cube: 100-Mile Housing
The exterior, engineered, LP siding is lightweight – relative to many alternate finishes.
Rigid foam insulation panels are lighter than some fiberglass-type batts. Vinyl floor products are lighter than wood floors and easier to maintain. Metal roofing is usually lighter than asphalt, has a much longer life and is maintenance-free.
I always ask myself, “Is there a lighter-weight product that will perform this function as well?”
Note: SIP’s (structurally-insulated panels) are a wonderfully effective and appropriate product that have amazing advantages in some Tiny Home construction. Please do some serious research into the benefits of SIP’s before deciding where and when to use stick-frame walls, roofs and floors.
Lofts, stairs and ladders, complex storage cupboards, washers and dryers, big appliances and ceramic tiles all add a lot of weight. Look for alternatives (ie: laundromats) if weight is an issue. And consider the weight of ten dinner plates instead of four, 4 casserole dishes instead of 1, 12 books instead of 30. It all ads up.
Cost
I really don’t know what I have spent on this project, but I consider the dollar amount irrelevant because I already owned a wide variety of recycled construction materials, all the solar components, and my generator. I accessed some great deals at my local Habitat ReStore and I own all of the specialized construction tools …and have all the design and construction skills required. I did not need to hire any help at all. If this is your situation as well, then my costs are likely still irrelevant to you.
Lifestyle
I salvaged the 4 cushions and a braided rug from a small travel trailer ‘seating nook’ and they do make a cozy seating area for intimate conversation. However, I only set this up when I’m expecting company. I have the two chairs at my table which have served well for my own use, and for the short-term or unexpected company.
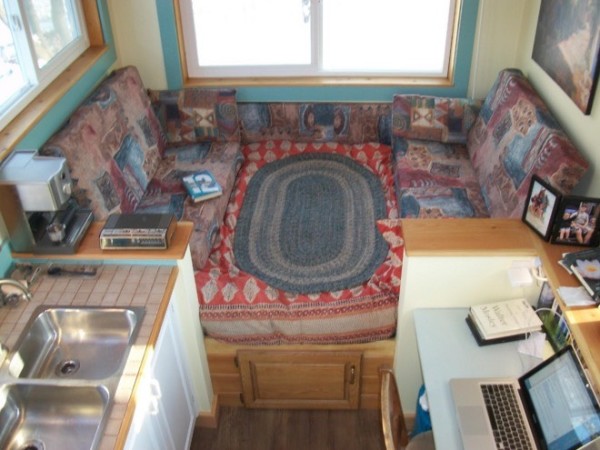
At most times my bed looks like the picture below, with a bolster for reading in bed and convenient side shelving for books, speakers, etc. 3-way switches allow me to operate main lights from the bed.
At most times my bed looks like the picture below, with a bolster for reading in bed and convenient side shelving for books, speakers, etc. 3-way switches allow me to operate main lights from the bed.

I have discovered that I really don’t need to furnish a seldom-used living room with couches, tables, and a lot of space between my guests and I. As a Tiny Houser, I have adapted to doing most of my socializing at my local coffee shop, library or aquatic centre, so the lonely cushions get to spend most of their time as added insulation in my ‘mechanical room’ (this is a small closet, accessed from the porch, where I installed my electrical panel, solar controls, inverter and batteries).
Electrical: I have a 12/2 extension cord running 60 ft. to a GFCI outlet outside my neighbours house. This serves me fine for my modest electrical needs until I dig out and mount my solar panels.
Water: At this time, because right now it is freezing outside, I use a garden hose from my neighbour’s house to fill my on-board, 30-gallon water tank. It sits under my bed inside the tiny house under a hinged flap so it will never freeze. The fill cap is outside the tiny house and very convenient. I find I only need to fill the tank about once every two weeks – no problem. (Hey, I don’t have any hair to wash, rinse, condition and rinse again!) And it keeps me aware of my water use …which I like.
In the summer I will just hook a potable water hose to a connection under my tiny house and use city water pressure instead of my RV water pump.
Space Heating: I use a mini-split heat pump, as described in my previous article, for space heating and cooling. This is the most efficient and carbon-friendly way I’ve found to have convenient year-round comfort …without concern when I’m away for a few days. Mine is a Senville LETO series because I wanted a 110V system rather than the more common 220V.
The indoor heating unit sits above my bathroom door in article photo.
Water Heating: I use a propane, tankless, on-demand water heater. Mine is a Bosch – but everyone has a different favourite. I think that reading consumer reports is the best way to research products that will meet your personal values. My on-demand heater is shown mounted on the wall inside bathroom, a short distance from both kitchen sink and shower.
Floor Plan: For those people who have asked: “Yes, please feel free to copy all or any part of this plan and creatively adapt it to your own needs.” I hope the scale legend in the floor plan view helps you to interpret the dimensions. Suggestion: Print floorplan and then construct your own ruler using scale provided.

I’m always happy to personally answer specific questions: petermatheson3@gmail.com
Previous article about this tiny house on wheels (with more photos and the design guidelines that informed this plan) can be seen at: https://tinyhousetalk.com/petes-125-sq-ft-tiny-house-on-wheels-in-british-columbia/
You can share this tiny house story with your friends and family for free using the e-mail and social media re-share buttons below. Thanks.
If you enjoyed this tiny house story you’ll absolutely LOVE our Free Daily Tiny House Newsletter with even more! Thank you!
This post may contain affiliate links and/or sponsored content.
Peter Matheson
Latest posts by Peter Matheson (see all)
- Smart-Framing a Lightweight Tiny House in Canada - February 1, 2016
- Pete’s 125 Sq. Ft. Tiny House on Wheels in British Columbia - January 4, 2016
Very, very nice job, article and design Peter. Luckily most of us live where just 2-3” of foam is needed.
I’d go full SIP and cut out far more framing. And make the skins structural.
I’m not a fan of sheetrock especially in a home that moves and too much a pain to install, finish. Nor would I even have it in a house as too easy to damage.
Better is plywood , 1/8”-1/4”inside and 3/8”-1/2” outside ends up less cost, labor, stronger and lighter.
And glue most everything especially if going to travel much at all. Carpenters glue works great, fairly cheap.
I believe I read in the article he used both glue and screws. I read in other articles glue alone is not the best as affected by temperature changes. Glue does not like to stick when cold or wet and some even melt in very warm temperatures which can cause adherence issues.
Joyce, it depends on the glue. Use the right glue for the right job and it’ll be better than fine.
Note construction adhesive rarely is the right one.
Yellow carpenters and urethane glues are.
A fascinating article, and full of really useful and thoughtful analysis. I really love the rain catchment idea you’ve used here – it’s simple, elegant, and, as you say, dirt simple to maintain. The layout looks quite comfortable, and I would be interested in learning more about your solar set up as well. Is your generator gas, or can you run it off the propane as well? It seems to me that having a common fuel would make things more efficient overall.
While I see your point regarding sheetrock and fire resistance, I have to agree with the above poster – I *loathe* the stuff. It’s a pain to work with, it’s overly fragile, and, for it’s structural properties, far too heavy. I, too, would use plywood sheathing and adhesives. Of course, my construction experience is in small experimental aircraft so that might also influence my opinions in the matter.
Thank you again for sharing your thoughts, and your floorpan – there is a lot here to inspire. Lovely work!
-jaime
something to consider is the fire rating of thin drywall is little to non and screws have poor shear strength which is way most building codes call for nails. A ringed nail has good retention and better shear strength and choosing the proper glue makes temperature and humidity not an issue, consider marine glue.
Peter, thank you for your very detailed explanation of your building process. This is one of the best free articles I’ve read on the subject ever — and I’ve been following this market closely for 35 years! So thanks again!
Pete, great article which explains most of the questions.
I think using SIP can reduce labor significant and I guess weight, too but not costs because they are prefab and there is labor involved.
One of the few things I would change is your sitting area bed by using a lift up bed and then occasionally guests don’t sit on your bed.
Again, thanks for the great inspiration, well thought details and sharing.
I think that this is my overall favorite tiny house—-well constructed,efficient, economical and very nice looking. I especially like the “no loft” feature—-I too am in my young 70’s and the usual steep and skinny staircase or ladder is not a great idea–as well as a space waster. Great job!
Peter – I loved your house when I first saw it, and I really appreciate the time you’ve put into this second article about all the details. The no-loft, one-story layout is inspiring and is affecting my own plans as I finally get them narrowed down.
You mentioned BC building code requirements. What does this have to do with anything? Cost to heat such a small space should be nothing. Did you have to submit full plans and obtain a permit before you could build? You’d probably have to submit stamped engineering calcs to prove this is safe to live in and transport on the road. Without this–who would insure? How would they insure? What about your liability in the event someone is injured? A lot of questions. I, too, think drywall has no place in a tiny home on wheels. Too heavy, outgassing, no structural contribution, messy… In your effort to reduce framing, what rooftop snow load can the unit safely support? I think the industry needs specialized structural engineers to review plans and certify before certificate of occupancy is allowed. And I think a COO should be mandatory. Then you would/could obtain a license/registration. Perhaps a different one for each region of North America. That would be a minimum starting point. Note also that these things need to be strong enough to withstand going down the highway at speed. How can anyone be assured it is? Hopefully no one is allowed inside during highway travel. A house can also be sealed too tightely. You need a transfer of fresh air for healthful living. Oxygen needs to come in somehow–water vapor out. Mechanically or by gaps in the structure. Your insulation cavity will become damp or wet and needs ventilation to dry out–or you WILL have mold (and that can be the end). If your drywall paint is not permeable then you sealed yourself in a plastic bag. How would the floor be repaired/replaced in case of flood or water damage without tearing the whole structure apart? There are solutions. Everything needs to be accesable/replaceable. These things need to be build more like boats and planes. If water and electricity are free (included) then that would dictate your mechanicals. I know exactly how I would build mine—but it all depends on WHERE it will be parked and HOW OFTEN will it be moved. I understand money is tight–but for those who think small house on wheels is cheap–think again. They need proper engineering/specifications–no room for errors.
Hi jm
I appreciate your concern about tiny house safety: assuring a healthy interior environment and rigidly following the current engineering standards to be safe and compliant with residential construction codes.
I respect your views and I, too, recommend those same principles to anyone who is wishing to mortgage, insure or remain compliant with their tiny house – and I thank you for sharing your well-considered examples with us.
I wonder if there is ALSO room in our developing community for creative innovation, experimentation and thinking ‘outside the box’?
It seems we often fail to develop new frontiers because we fear failure or mistakes. I like to embrace my ‘mistakes’ as positive feedback along the learning curve, leading to my greater knowledge, creativity and understanding.
And while I understand that this concept is uncomfortable for the people who value security, approval, dependability, insurance and safety, I love the idea that we’re all different in our housing needs and, by celebrating our differences, we complete a complex puzzle in which we can all find our comfortable niche and our contribution to the whole.
I think fondly of our nomadic cultures that lived in teepee’s, yurts and tents …the resourceful pioneers who constructed cabins out of logs …the freedom of the gypsies in their vardo’s …the hippies renovating their VW vans into campers …our inspired ‘Walden’s’ and those others who took us on ‘the road less travelled’.
I hope that we will always have some room in our hearts to support those pioneers and visionaries in our evolving tiny house movement – those who aren’t always willing to sacrifice their environmental concerns, their dreams and their freedom simply to be compliant with a less imaginative society. There’s room here for all of us and we all need each other.
Me? I still wish to build my home in the clouds – and then hope I have enough time to slam wheels under it before it gets stuck to the ground.
Pete
Thank you so much for your invaluable expertise and experience. Your presentation addresses many of the issues one encounters in putting a house together, and I, for one, am grateful.
I know some people are not comfortable without all kinds of regulations in place and authorities overseeing everything. And that’s ok. But there are others who want to experiment and we should be able to do that. I am certain that quite a bit of research went into your building project and that you selected materials and methods that you thought best for your circumstances. Congrats on a job well done!
A most eloquent rebuttal to the ever sprawling “big brother mentality”. The disease that suffocates civilizations.
Highest respect!
Love your reply! I admire your open resolve and wisdom!
Thank you for so much,
Carolyn
I appreciate and applaud your efforts. My, and everyone’s comments and opinions should be taken as free ‘value-engineering’ (“that’s not part of the contract” they usually say….) Hopefully some guidance will emerge as to what works best for particular situations with these talks and opinions–no criticism. Just to help those going this route. We’ll forever be debating just how much freedom can be allowed vs. protecting society.
This post addresses small houses on wheels. I’m just trying to figure out: when is this the best alternative?
Very NICE. Lovely, simple & the space is very economically designed–with considerations for reality in build & lifestyle. This might seem like a silly question & I’m sure there’s a good answer. But here goes: I wonder why so many tiny homes have entrance door opening inward & not outward. That entry space reserved for the door opening inward seems somewhat wasteful to me–an outward opening door would free up that little entry space for use. Is there a rule about this or something I don’t know about? Thanx for sharing all your build intentions with us! Sally V
Yes Sally, there IS a rule in the BC Building Code that requires exterior residential doors to swing into the house.
Reason #1 is that hinge pins outside the door are easily pulled and then the door can be easily removed by thieves.
Reason #2 is that an exterior door swinging out doesn’t allow for a screen door to be conveniently hung.
Reason # 3 is that often there is a snow buildup to contend with and that the actual door is more exposed to destructive weather elements.
It’s an interesting sidebar that in commercial construction all exterior doors are required to open outwards, for panic egress.
Pete
Peter, regarding these rules:
1: There are hinge systems that open outwards that don’t have pins on the outside. No idea what they are called, but has seen them in hardware stores.
2: So what that you can’t fit a screen door? Anyway, with an out swinging external door one could easily mount an in swinging screen door. Removable for the winter type months of course.
3: Having an inward opening door protects what… 2 inches of the door? Not exactly going to make a lot of difference surely.
Commercial buildings: Ah yes, panic egress… which of course never happens in a domestic building at all. /smh
Probably businesses would sue the pants off the council if there were a fire or other life threatening emergency and people couldn’t get out and subsequently died. Refer Christchurch earthquakes in 2011 and 2012, and now just in the last couple of days or so the earthquake in Italy. Lots of the brown stuff has, and still is, flying over some of the things that happened in Chch, but the small people have struggled against Insurance Companies and Government Departments. What’s new huh? I suspect the same will ultimately happen in Italy.
Well, public egress has to follow mob rules… If the door opened inward then all the people in the front would be crushed by the rest pushing forward but if the doors open outward then even if blocked by snow the sheer mass of people can push out and get out like a flood gate opening.
Residential is different as you are unlikely to have a mob of people trying to get out and something like a single person would find it far easier to open a door inward rather than try to push out if blocked by snow.
Having the screen door on the exterior also has benefits… First it can take the brunt of the weathering and is cheaper to replace… Second, having the door open inward allows the screen door to remain in place so you don’t let any bugs in during the summer and can let in some fresh air…
If you had it like you suggested with the inward swinging screen door and the outward swinging outer door then you would have to open both before then closing the screen door and it would be harder to keep the outer door open to let air in…
Also, having the door open inward means the interior side never needs to be exposed to the outdoors and so only one side of the door would really have to handle the weather. But if it opens outward then the whole door gets exposed.
Among other things its effects… Like it would be harder to let guest in with an outward swinging door as they would have to get out of the way of the door to let you open it for them to let them in vs pulling the door in and they simply step inside…
Do you get any condisation issues during the cold while heating the interior?
Hi Xue
I did not have any condensation during the winter – beyond the normal, but infrequent, very small amount of moisture collecting at the bottom of my thermal window glass if I was boiling lots of water or cooking moist foods without opening a window and venting to the outside.
I do not have long showers and I close my bathroom door and leave the window open during my shower to release any excess water vapours to the outside. I often leave a window open a small amount during the day to freshen my air.
Another factor may be that my mini-split heat pump has a dehumidifying setting that absorbs moisture from the inside air, and I have that moisture draining to the exterior.
I also live in a very dry climate in southern British Columbia.
I hope this helps.
Pete
Traditional framing and interior design, with a lot of thought towards comfort… Not a novel idea, but a good one nevertheless…!
if I built a tiny home tomorrow, I spend a bit more and build with SIPs. they are very energy efficient and the building envelope would be complete in a day or two.
Very good idea!
I’ve done a lot of construction over the years but am a complete newbie to the small house way of thinking. Has anyone ever tried framing with metal studs? There could be a weight savings there.
I know I’ve seen one using metal studs. Unfortunately I haven’t kept any links to any. One attraction, to my inexperienced mind, is that the termites won’t eat them.
Not to say you are brilliant with simplicity because you made it to 70 yet I am sure it helped. Often I look at these wheeled designs and realize one would have to be a gymnast to get around in them, are way too heavy to be pulled by anything but a big truck and are way beyond “affordable” based on their limited sq. footage.
Thank you very much for sharing what I believe is probably the most sensible and well thought out design, for your footprint, than anything else I’ve seen. I hope your design gets replicated world wide.
Hi Mark, I really appreciate you taking the time to post your kind comments. Thank you. Pete
Glad you liked it 🙂
I love this. Can I please buy guide to build it?
Hi Shirleyy, I’m afraid that there is not a guide for this to purchase, from what I know.
Hi Shirleyy
Natalie is correct, I have not produced a construction manual. However, between the two articles at tinyhousetalk, (this one and https://tinyhousetalk.com/petes-125-sq-ft-tiny-house-on-wheels-in-british-columbia), I think there is enough information for a competent builder to complete a similar house. If you run into any problems, I’m just an email away from you and always happy to help. I’m pleased you like it and wish you success. Pete
Thanks, Pete!
I am so taken by this tiny dwelling. I would pay you well if you would make me a plan for this. You really have talent.
Hi Shirley. If you email me I can send you a more defined set of plans based on the plans shown in my article. I can also add some structural notes and a materials list if that would help.
Hi, Peter:
I am wondering about how’s the weight of your tiny house and what kind of truck (GMC 1500 or 2500) can tow it? Thanks much.
Sorry Te, I never had it weighed. You may notice in the photos that I pulled it with my little Jeep Wrangler, without any strain. https://tinyhousetalk.com/petes-125-sq-ft-tiny-house-on-wheels-in-british-columbia
Dear Pete,
I love the simplicity and efficiency of your tiny home and it’s application as alternitive shelter.
With few modification it could be handicap accessible and transitional eldercare. At my age, I now think of extended autonomy and functionality as a possibility in my backyard, if I have a tiny built, and rent out or have my children & grands move into my cavernious home. Can you reccomend a tiny contractor in Washington State with your passion and ethics? Thanks for sharing! Cat
Hi Cat
The only person I am in contact with in Washington State, that is pursuing tiny home building projects is at the email: baconbarry@juno.com
He is passionate about providing housing for the homeless and is working closely with the building authorities in his area to make his dream a reality. Perhaps he will be able to provide some relevant information to you.
Of interest, I have hosted a person with disabilities inside my tiny. As a paraplegic, he totally relies on his custom, motorized wheelchair, guided by a single joystick and he was able to comfortably access, visit and turn around within my home. I have a ramp entry to a small deck outside my door which is only 2’6″ wide. However, my bathtub is a long, long way from ‘accessible’.
I saw your video yesterday and just soooo very much appreciated your spirit and intention not to mention all of the thoughtfulness apparent in your design. I loved how you said there simply is no way to describe the sense of liberty you now have after moving into your tiny house. I’m looking forward to the same experience you describe. Also, I absolutely agreed with what you said about NOT putting the door on the narrow end of the house. To me that forces a corridor to run the length of the house which cannot help but consume precious space which will irreversibly define how the remaining space must be used. Another things that is typical but drives me crazy about most tiny houses I see is the odd placement of windows too high or too low and cupboards at eye level. I am very tall and don’t want anything in my way, not a vent hood, shelf, nothing. Anyway, you are just absolutely sweet and I really appreciate Bryce interviewing you, the excellent work he does and all the details in this article which I have saved and will use when we move into building our tiny house next summer!
Hi Joyanne. Thanks for the supportive comments. I’m sure you’ll enjoy building your THOW and that you’ll end up with a very sweet home. Have fun!
This is beautifully done! I have a couple of questions, first about SIPs. How dangerous is the foam if it should catch fire? No one addresses this. I rented an A frame cabin back in the 80s and there was warning signs all over about the foam construction, if it caught fire. I think it is a great weight saver if that is not a problem, and how many post and beams are used for the roof, because I only “see” the one? Also love the PVC gutters. I have a small house, and a big car port continuous roof, lots of catch, and used a [free from my cousin]6″ heavy wall water main pipe and cut a groove out that fit over the R panel ends It runs lots of water into my rain barrels. You are the first I’ve seen to use this very simple/efficient way to catch rain water! Great job on a very usable floor plan, for older folks, like me! LOL! It is a must to be able to get to a bathroom in the night quickly!
Hi Cheryl
Thanks for your comments and questions.
The foam inside SIP’s is VERY dangerous and toxic if it catches fire …however, due to the construction process, the actual foam is never exposed to any flaming opportunity. Think of an SIP like an insulated entry door on your home – it is a sandwich of 2 steel panels filled with foam but it has a 3-hour fire rating. A typical wood-framed, insulated and gyproc-clad wall is usually rated at an hour. Also, SIP’s in construction are often clad with drywall/gyproc on the interiors. Foam insulation products are commonly used in residential construction – right from foam block foundation walls to ceiling insulation. For a SIP fire demonstration: https://www.youtube.com/watch?v=_nxZFo-ICPo
I have 2 beams on posts in my tiny, one at the entry door and one between bed and kitchen. I also have a shear wall supporting the roof between bathroom and main space. This can be seen best in the youtube: https://www.youtube.com/watch?v=n-K8l43sZgA
This is more like a traditional caravan in its practical layout with the sleeping area at one end etc. Very well thought out and there is a reason they have survived through the decades in one form or another. As to fire etc, as long as there is a window big enough to get out of at the opposite end to the door there should be no problems, plus how many of these commercial camping trailers and the like have expensive fire retardant in, I’ve lived in a number over the years and the walls are simply metal on the outside and hardboard on the inside, newer ones with some insulation which means not as much condensation in the winter (our present tiny home (12’x38′ and 4 adults resident) has no condensation problems even though it is 20 years old whereas the first one some 30 years ago (8’x24′ and 2 adults) frequently had condensation running down the walls in winter and without heating was very cold to live in, as in ice in the bed coverings. But the first could be pulled by a 2liter car while the current one travels on a flatbed so for ease of moving the first one was much easier. Swings and roundabouts and you need to decide on your priorities, then your bank balance, and somehow reconcile the two.
It looks nice but to me the framing does not look to smart. It looks to weak in horizontal movement. Nice but not for me. I would use standard framing but steel instead of wood. One third the weight and three times the strength.
Peter rocks and is kind and helpful! Thanks Peter!
From one 70+yr old to another….I been following the tiny house movement since Jay’s beginning…..seems it has evolved into overpriced mini mansions….Your tiny house is one of the best I have seen. Love the repurposed trailer & materials. Post & Beam makes a lot of sense.
GREAT design.
Comments on door andscreen doors . my sisters travel trailer has screen door inside of outside door . both open to the outside .both can be opened ay same time . outside door left open in good weather. and screen door closed to let nice weather in. screen door has sliding panel to access outside door at any time just a thought.
TO DO something, however small, to make others happier and better, is the highest ambition, the most elevating hope, which can inspire a human being. Less Is Better