When Katy Zientek was pregnant with her second daughter, she spent her evenings watching tiny house shows on Netflix. Something about the idea resonated. After seven years of renting, she and her husband Michael had a family shed on their Texas property that wasn’t being used. What if they could transform it into a real home? Not a temporary solution or a compromise, but a charming farmhouse cottage they could actually live in — for about $15,000 in materials.
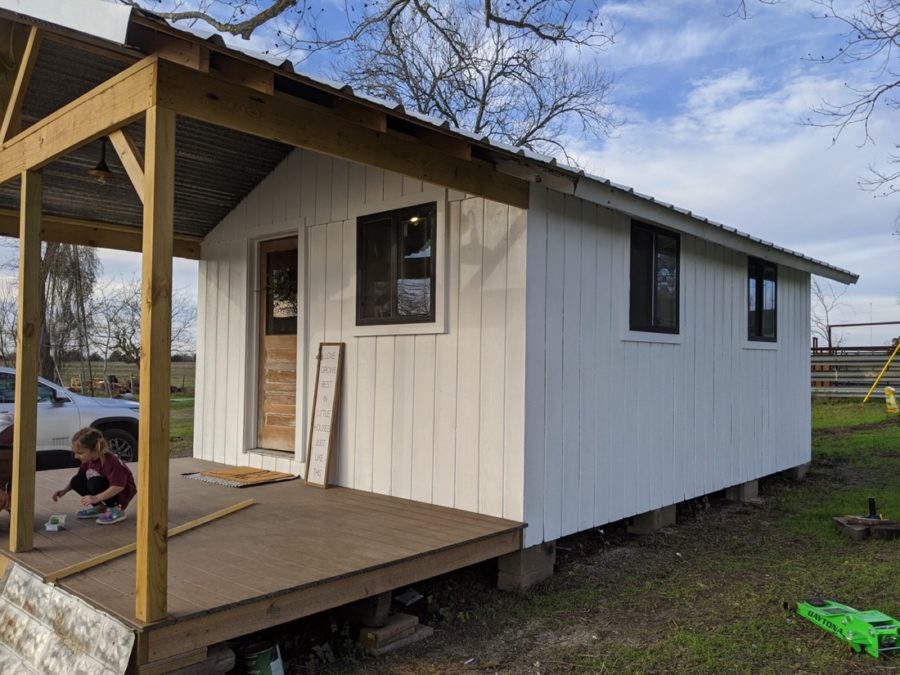
That vision became reality. Over the course of nine months, from September 2020 to May 2021, the couple turned an ordinary storage shed into a 280-square-foot home complete with a downstairs bedroom, full kitchen, open living area, bathroom, and a covered front porch. They did most of the work themselves with help from friends on weekends, and hired a contractor only for the porch construction. The result is a charming, fully functional tiny home that allowed them to stop renting and start building equity — all while staying well under $20,000.
This is what shed conversions offer: an accessible path to homeownership that doesn’t require years of saving or taking on massive debt. If you already have a shed structure or can acquire one affordably, you’re starting with the foundation, framing, and roof already in place. What remains is insulation, systems, and finishes — challenging work, but achievable for determined DIYers willing to learn as they go.
Images © Katy Zientek
How the Dream of Tiny Living Began
Katy’s introduction to tiny houses came through streaming documentaries and reality shows featuring families who had downsized dramatically. She was drawn to the simplicity and the financial freedom it represented. After years of paying rent with nothing to show for it, the couple had a family shed sitting unused on their property in Round Top, Texas. The idea clicked: what if this shed could become their first home? Michael was initially skeptical, but Katy’s research and determination convinced him it was worth trying. They had two young daughters and needed more space than an RV or van conversion could offer, but they also couldn’t afford traditional home construction. A shed conversion hit the sweet spot — affordable, faster than building from scratch, and large enough for a family of four to live comfortably while they saved for a larger permanent home.
Images © Katy Zientek

Images © Katy Zientek
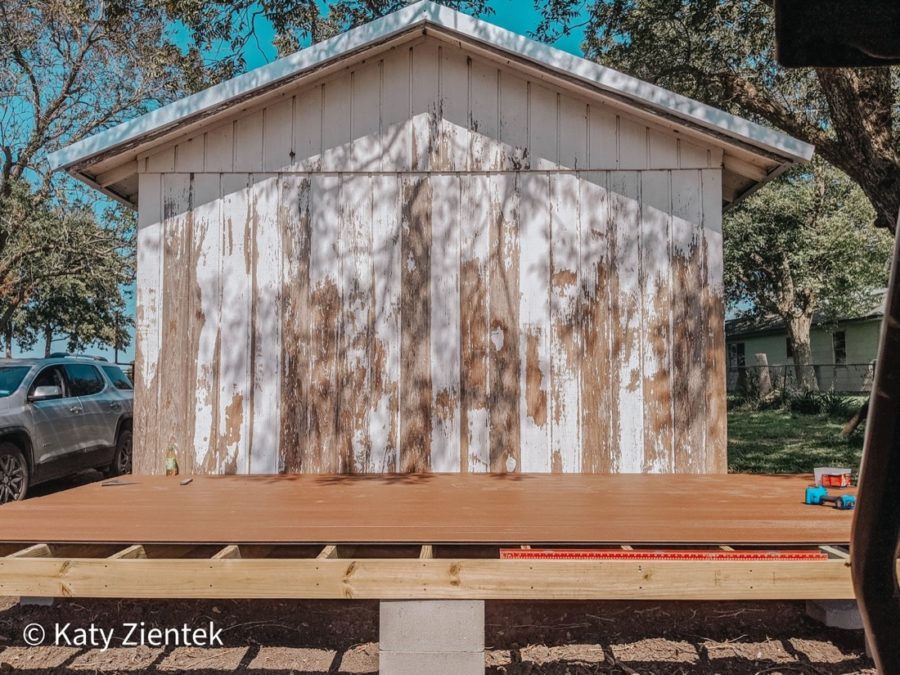
From Ordinary Shed to Building Site
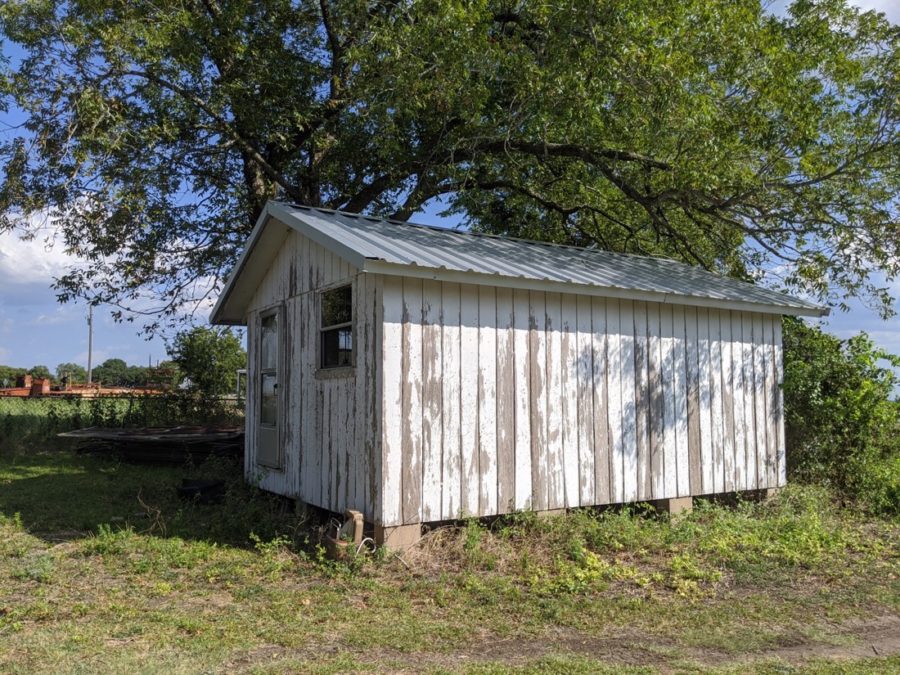
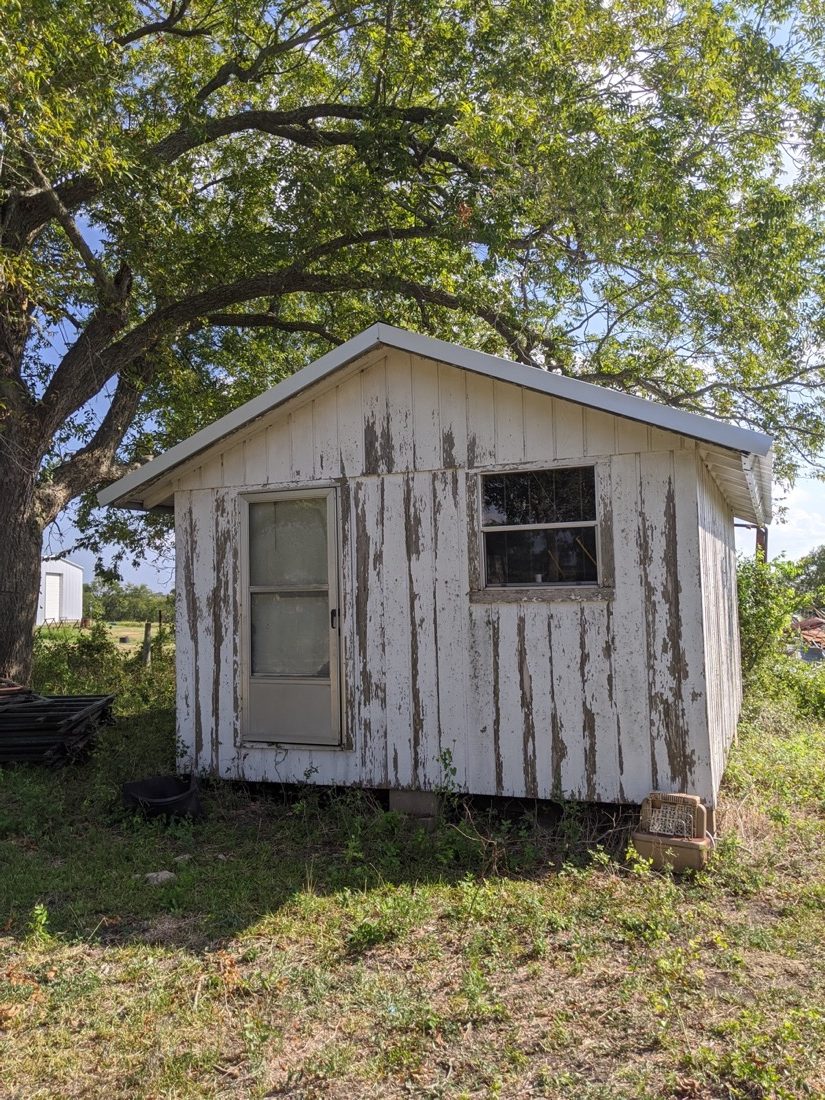
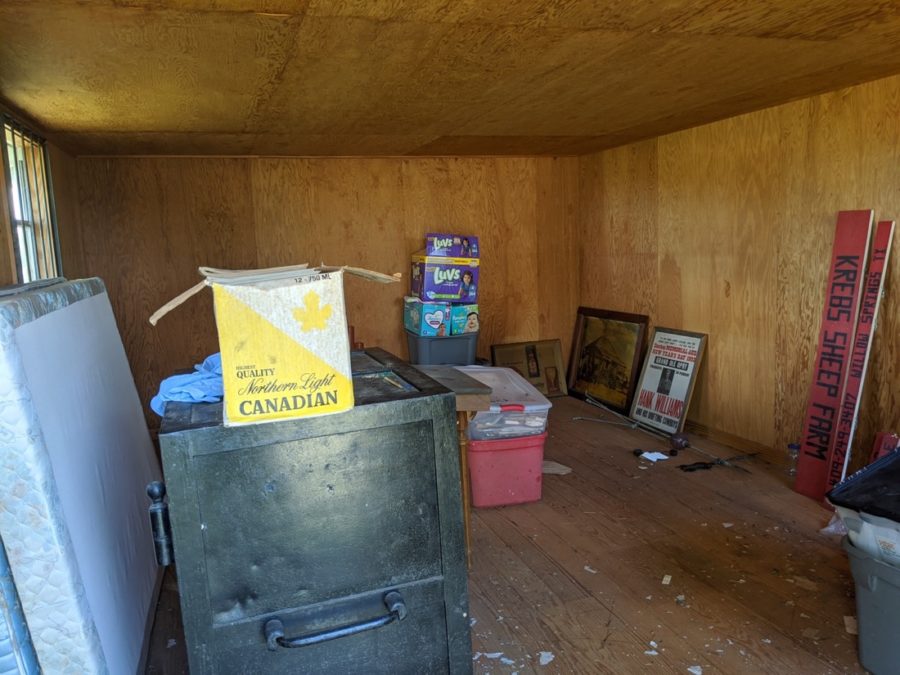
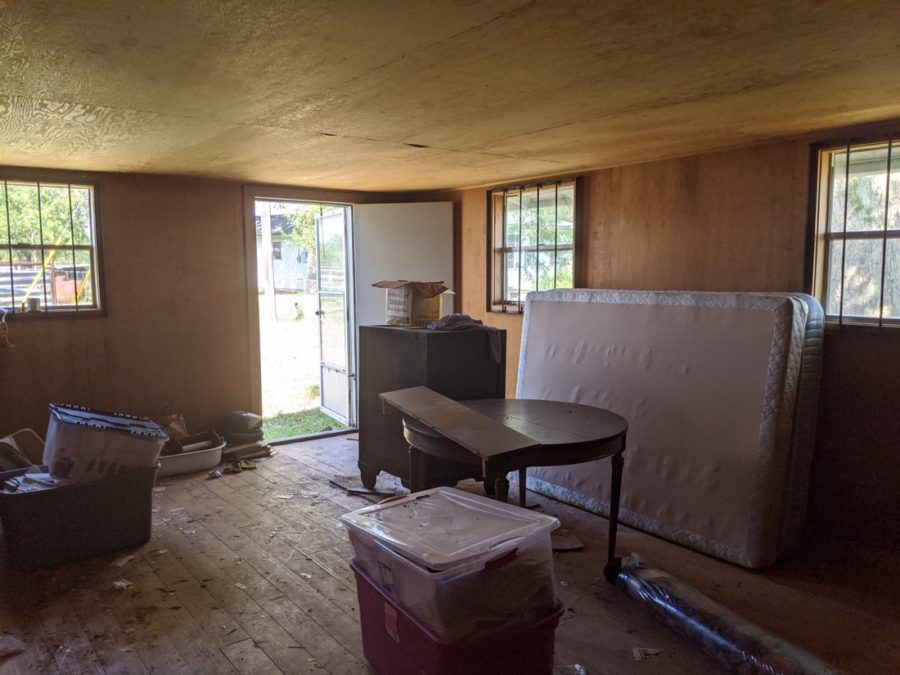
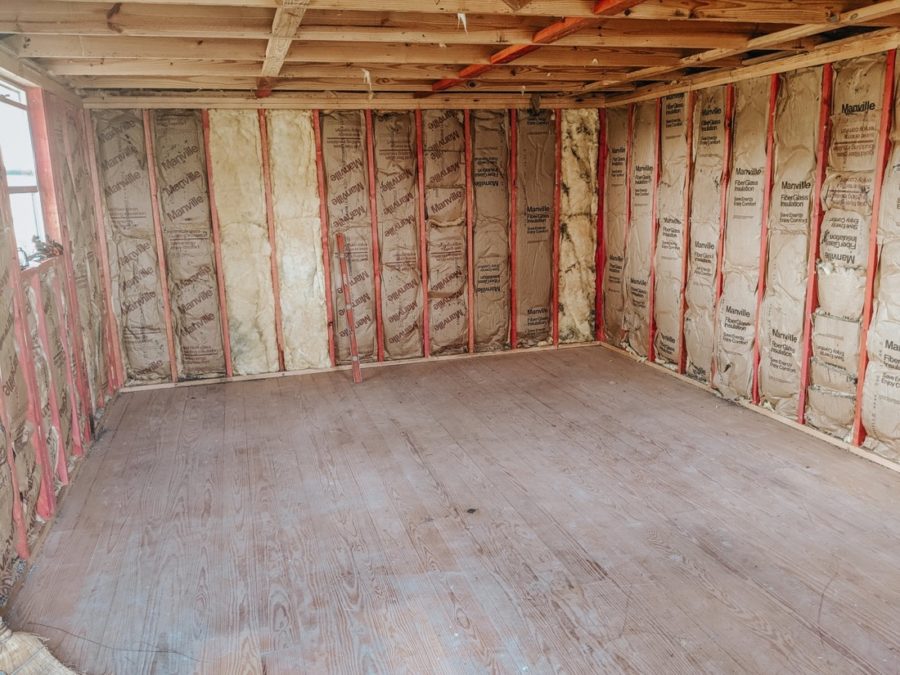
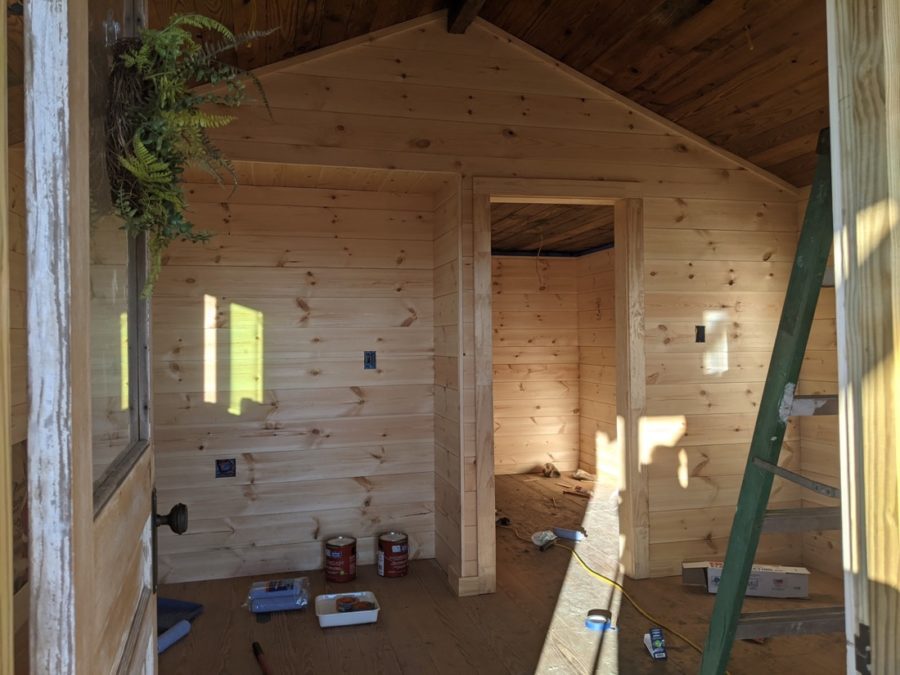
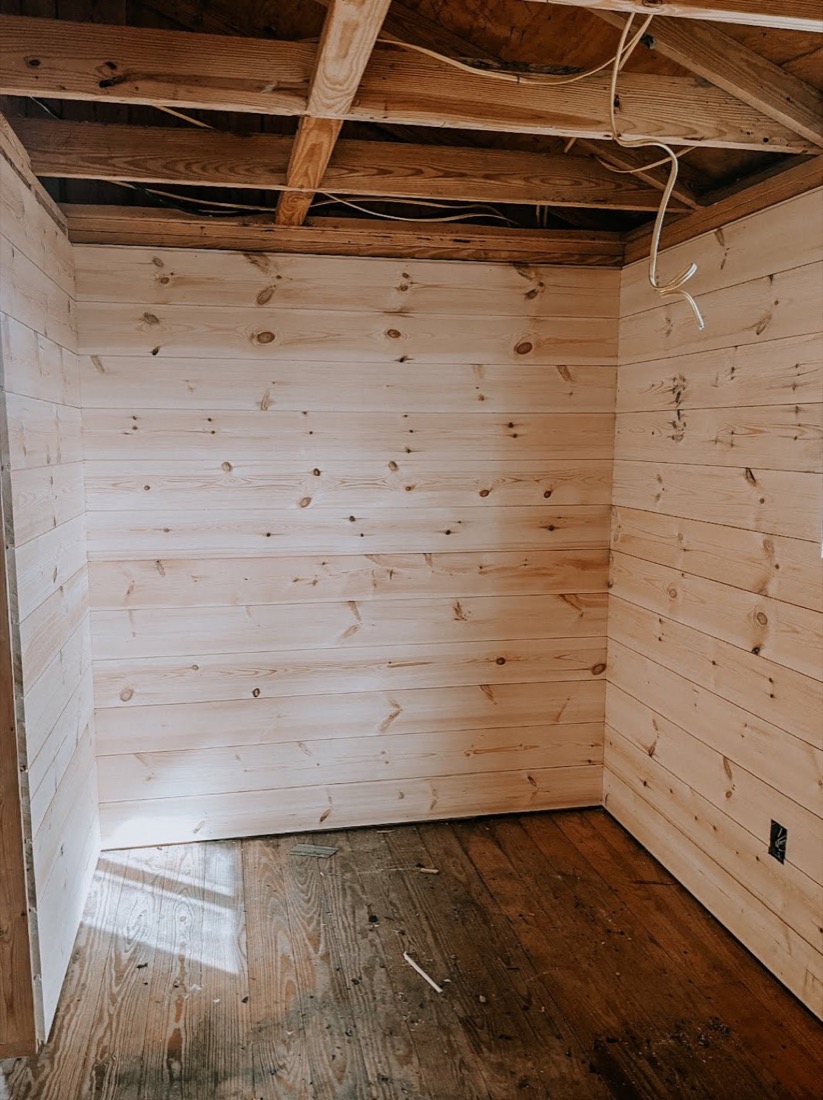
The starting point was a basic shed — nothing fancy, just a rectangular structure with walls, a roof, and a concrete slab foundation. It had been used for storage, which meant it lacked insulation, plumbing, electrical wiring, and interior walls. Essentially, they had the shell of a building and needed to transform it into a livable dwelling. This is both the advantage and the challenge of shed conversions. You skip the most expensive and time-consuming part of construction (the foundation and exterior structure), but you’re responsible for everything that makes a house functional: insulation to keep it comfortable year-round, plumbing for water and waste, electrical systems for lighting and appliances, and interior framing to create distinct rooms. The couple approached this systematically, starting with the most critical structural work and gradually adding the systems and finishes that would make the space livable.
Images © Katy Zientek
Images © Katy Zientek

Images © Katy Zientek
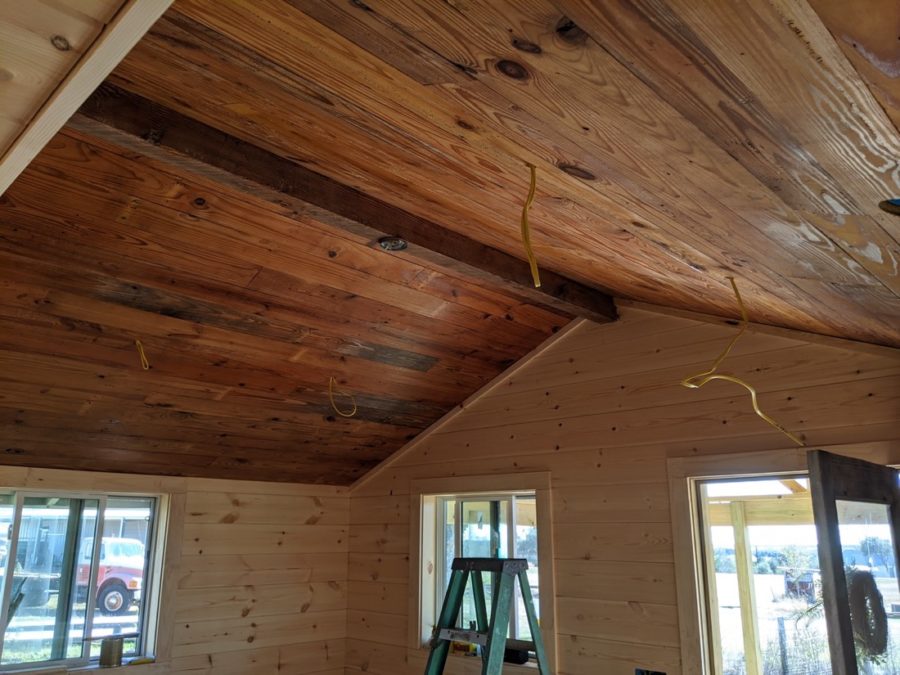
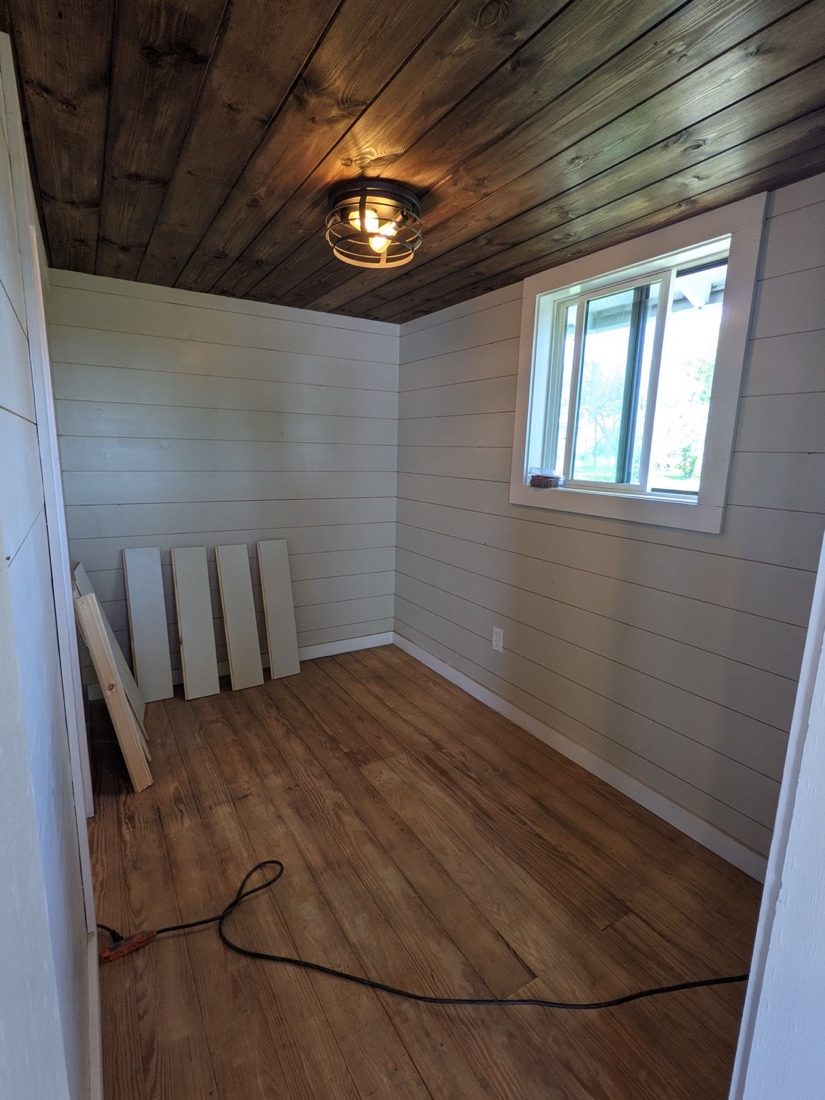
Framing Walls and Insulating for Year-Round Living
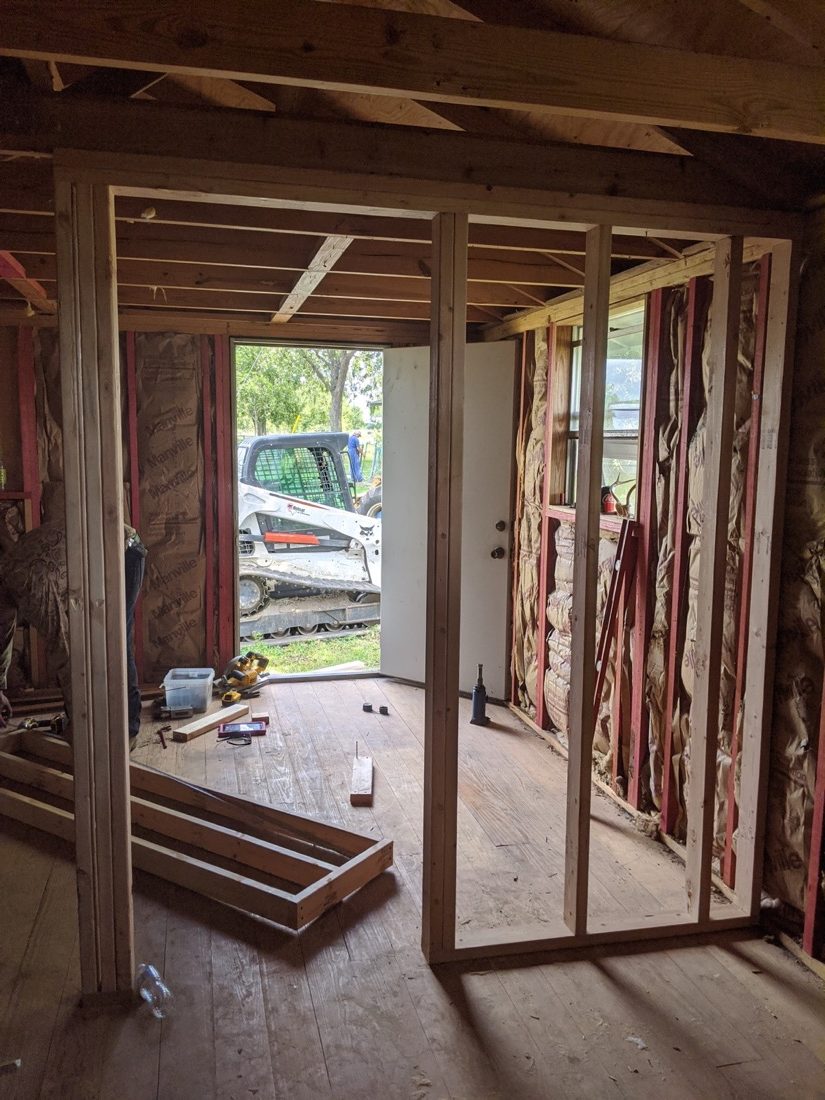
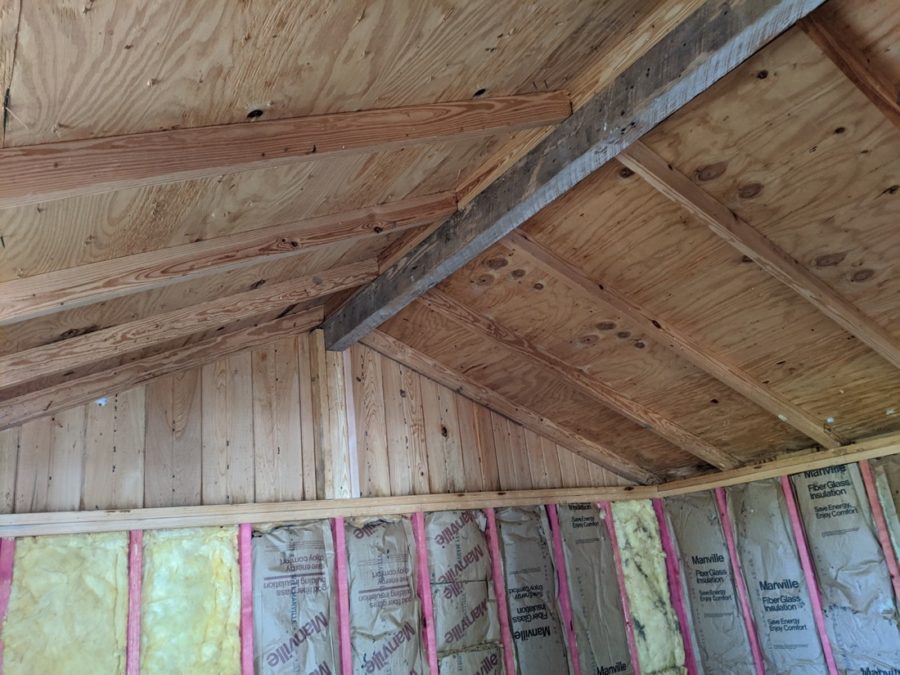
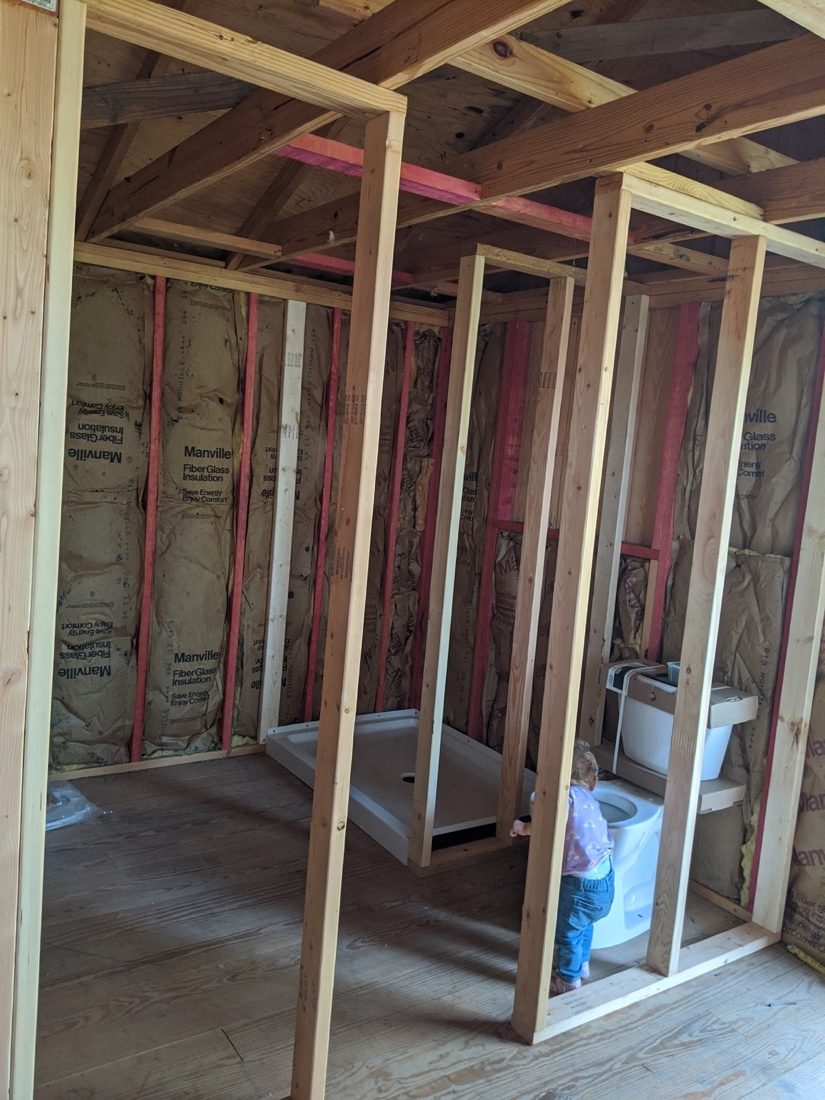
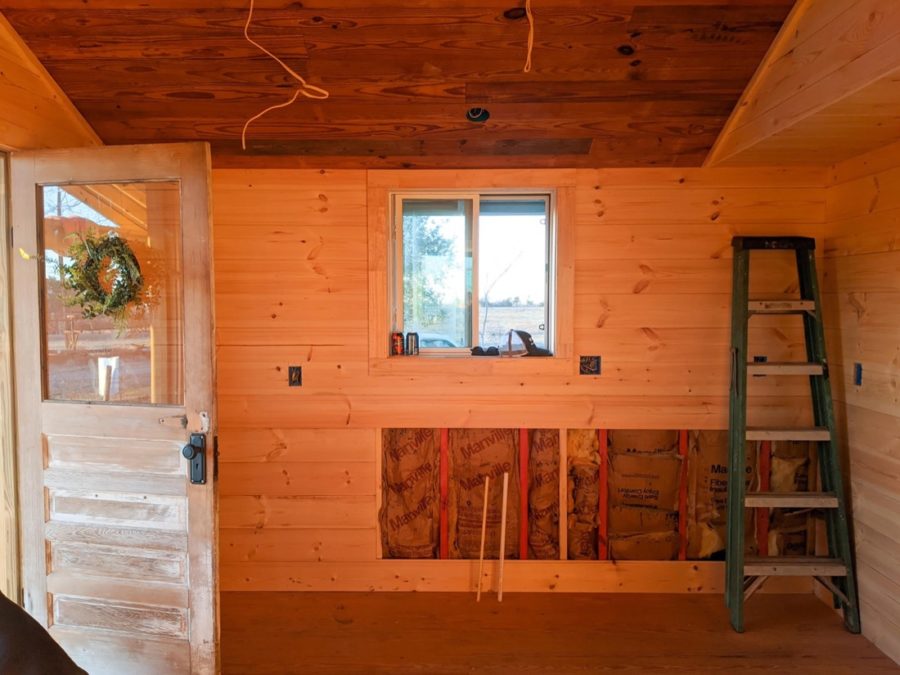
Insulation is where many shed conversions fail or succeed. A storage shed isn’t designed for human comfort — it’s built to keep your lawnmower dry, not to maintain 70 degrees when it’s freezing or sweltering outside. The couple framed new interior walls, which allowed them to add insulation between the studs and create a thermal envelope that would keep the home comfortable in Texas summers and winters. This step also gave them the opportunity to run electrical wiring and plumbing lines before closing up the walls. Framing interior walls also defines the floor plan. In a 280-square-foot space, every partition matters. They needed to carve out a private bedroom (since they have two young daughters), a functional kitchen, a bathroom, and an open living area — all without making the space feel cramped or chopped up. The framing stage is where those decisions get locked in, so careful planning with measurements and mockups ensures you don’t end up with awkward dead space or rooms that feel too tight.

Images © Katy Zientek
Images © Katy Zientek
Images © Katy Zientek

Images © Katy Zientek
🏡 Want to learn how to build your own tiny house on wheels?
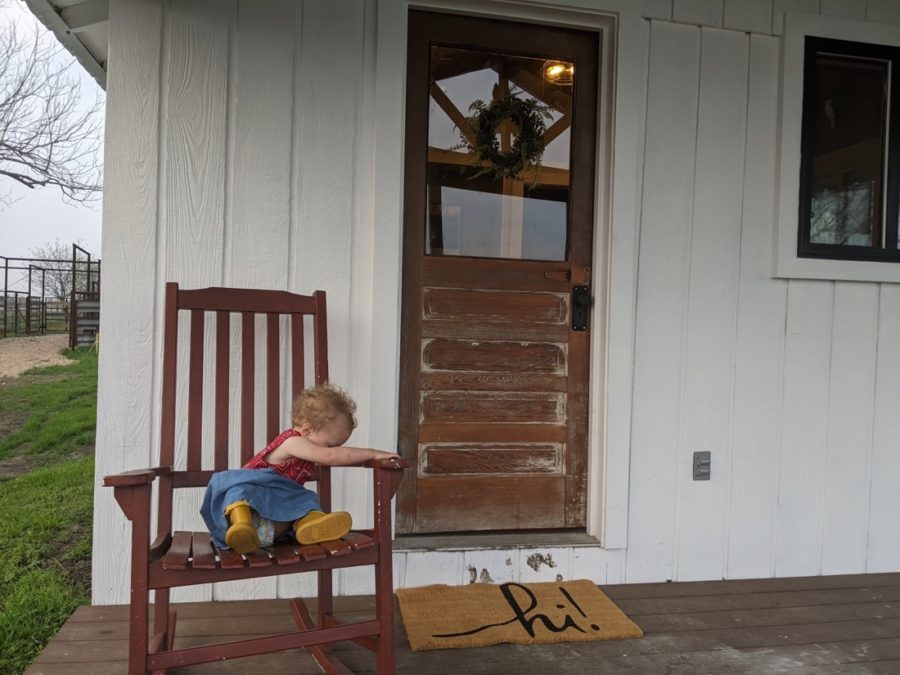
Building as a Family with Little Helpers Watching
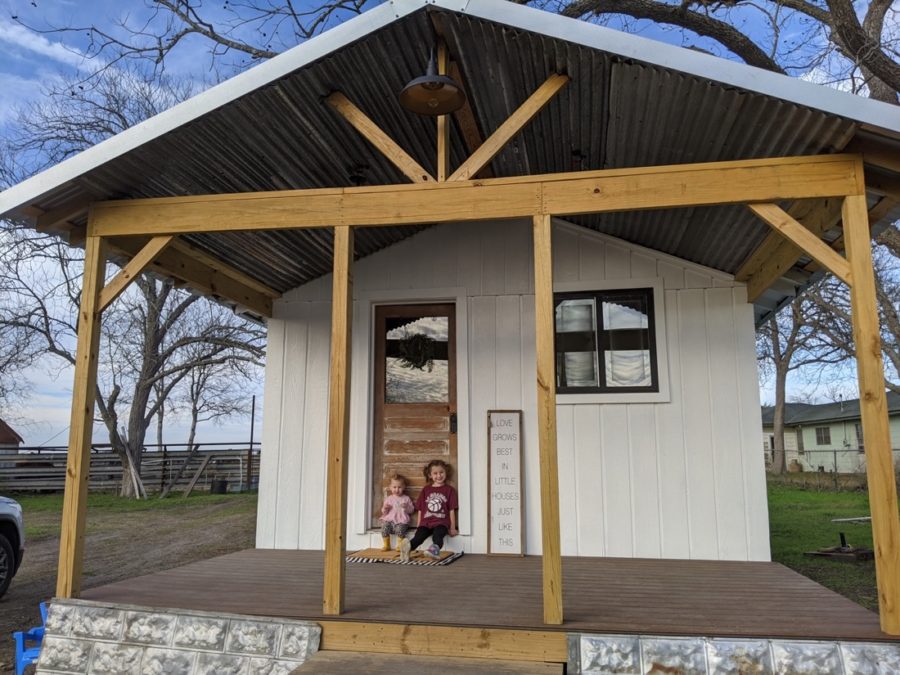
One of the most memorable aspects of the build was having their two young daughters on-site, watching their parents transform a shed into a home. Kids learn by observing, and there’s something powerful about showing them that homes aren’t just bought — they can be built with determination, patience, and hard work. The girls saw their parents problem-solving, measuring twice and cutting once, and working through mistakes. That’s an education you can’t replicate in a classroom. For families considering a DIY build, having children involved (even as observers) can be both a challenge and a gift. It slows things down, requires extra safety precautions, and means you can’t work as many late nights. But it also creates shared memories and instills a sense of ownership and pride that renting never provides. When the build was finished, this wasn’t just a house the family moved into — it was a home they created together.

Images © Katy Zientek

Images © Katy Zientek
Images © Katy Zientek
Plumbing, Electrical, and Making It a Real Home
This is where a shed officially becomes a dwelling. Plumbing means running water lines for the kitchen sink, bathroom sink, and shower, plus waste lines that connect to a septic system or sewer. Electrical work means wiring for outlets, light fixtures, and potentially a breaker panel if the shed wasn’t already connected to the grid. These are the systems that local building codes care about most, and for good reason — improper plumbing or electrical work can lead to leaks, mold, electrical fires, or worse. The couple tackled much of this work themselves, learning as they went through YouTube tutorials, books, and advice from friends who had construction experience. For anyone considering a similar project, these systems are where it’s worth investing extra time to do it right, even if that means hiring a licensed professional for inspections or the most complex portions. Once the plumbing and electrical rough-ins were complete and inspected, the home crossed a critical threshold: it was no longer just a shed with walls, it was infrastructure capable of supporting daily life.

Images © Katy Zientek
Images © Katy Zientek

Images © Katy Zientek
Images © Katy Zientek
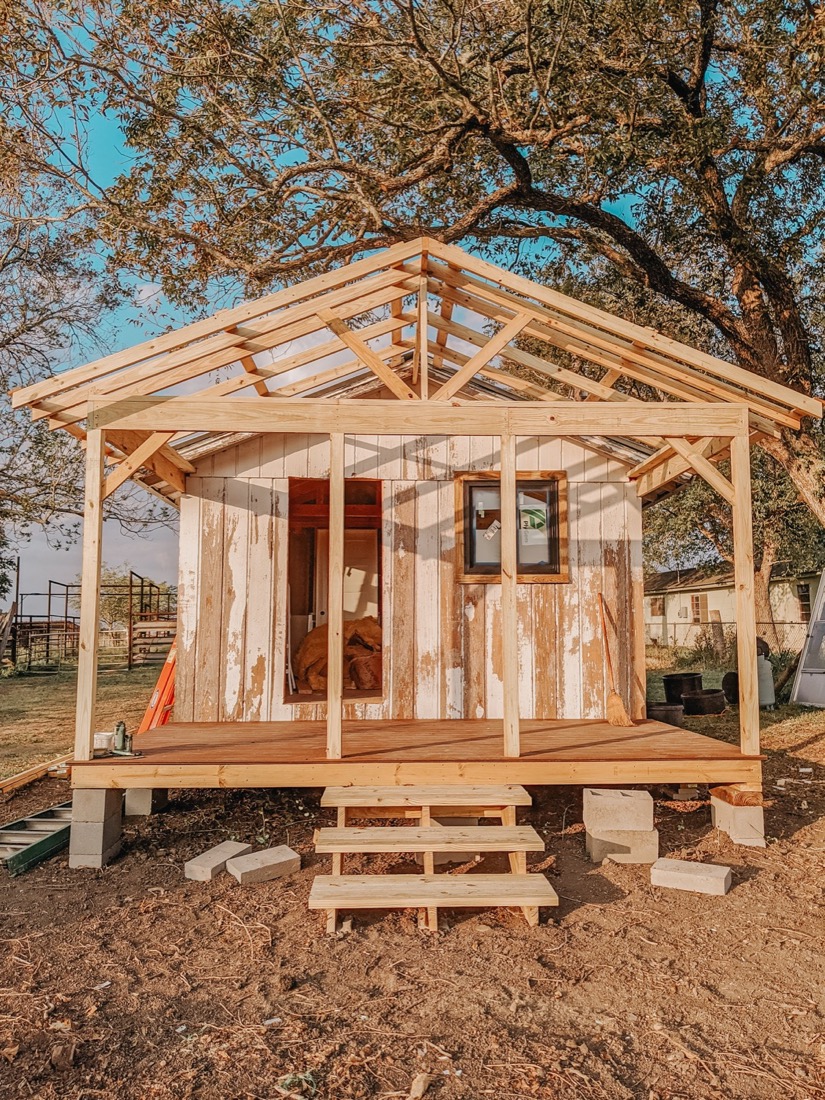
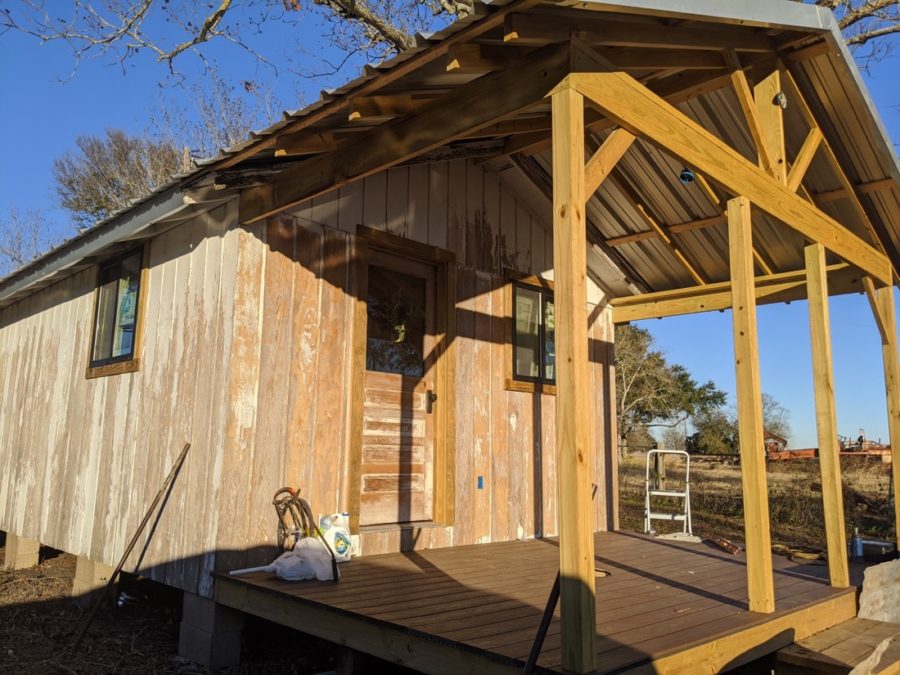
The Covered Front Porch That Extends the Living Space
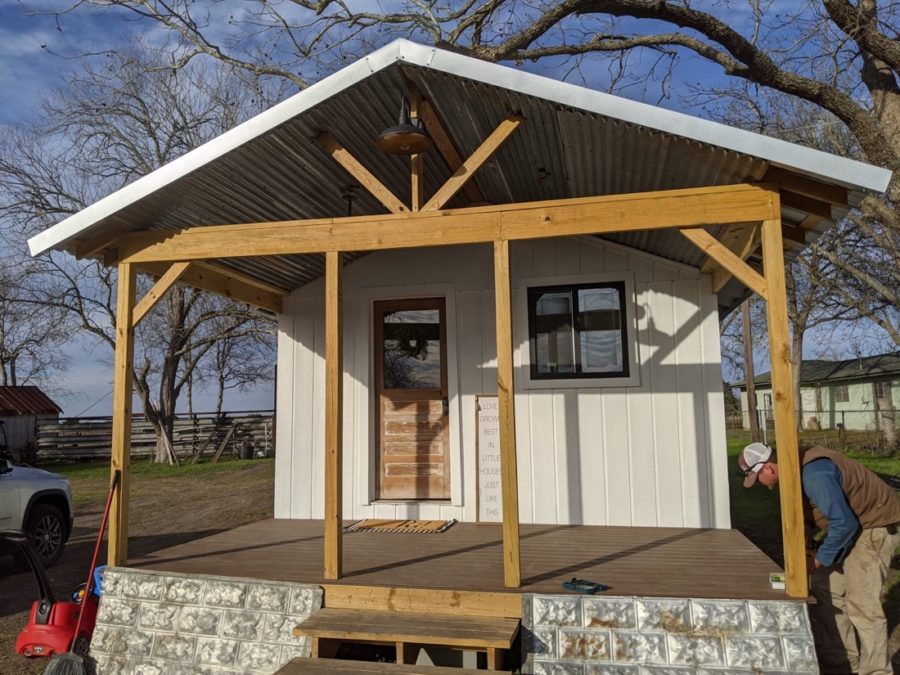
When you’re living in 280 square feet with two children, every usable square foot matters. The covered front porch is where this home gains significant functional space without adding interior square footage. Covered porches are essential for tiny living in climates with strong sun or frequent rain — they create a transitional zone between indoors and outdoors where you can spend time regardless of weather. For this family, the porch became a play area for the kids, a spot for morning coffee, and an extension of the living room when they needed breathing room. The couple hired a contractor to build the porch, recognizing that this was a more complex structural project than they felt comfortable tackling alone. This decision is worth noting: even committed DIYers don’t have to do everything themselves. Hiring professionals for specific portions of the build (especially structural work like porch framing or tasks requiring specialized skills) can save time, reduce stress, and ensure the work is done safely and correctly.
Images © Katy Zientek
Images © Katy Zientek
Images © Katy Zientek

Images © Katy Zientek
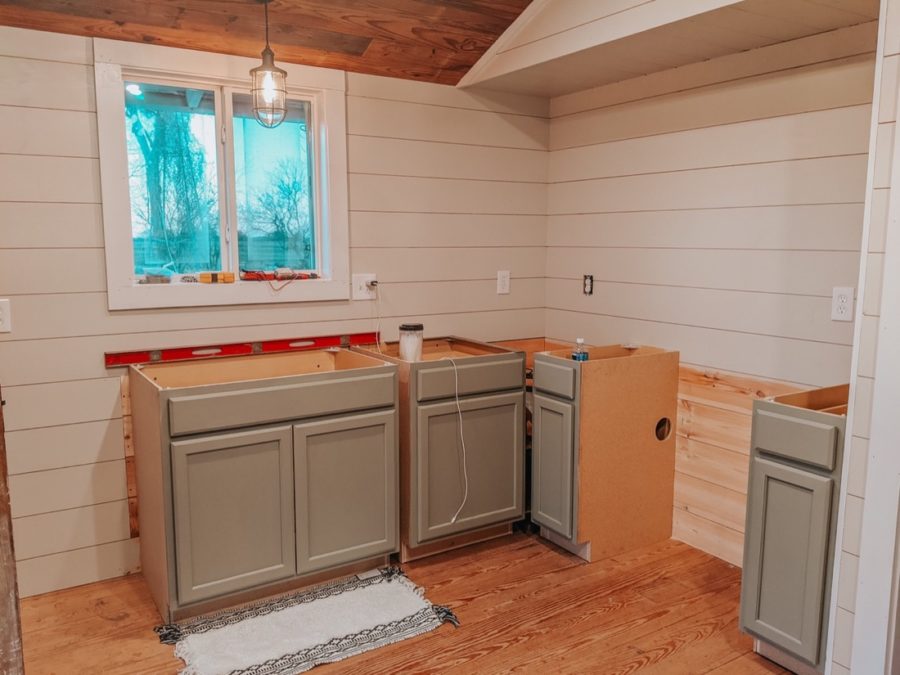
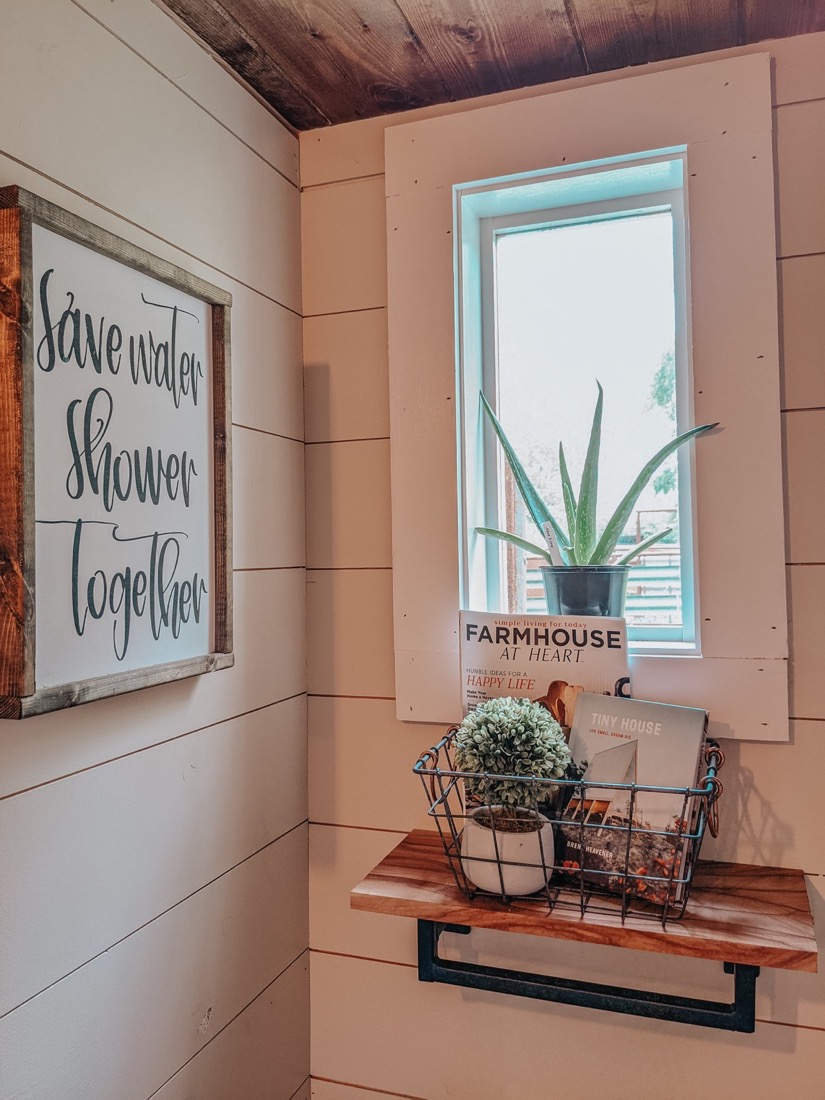
Interior Finishes and the Farmhouse Aesthetic
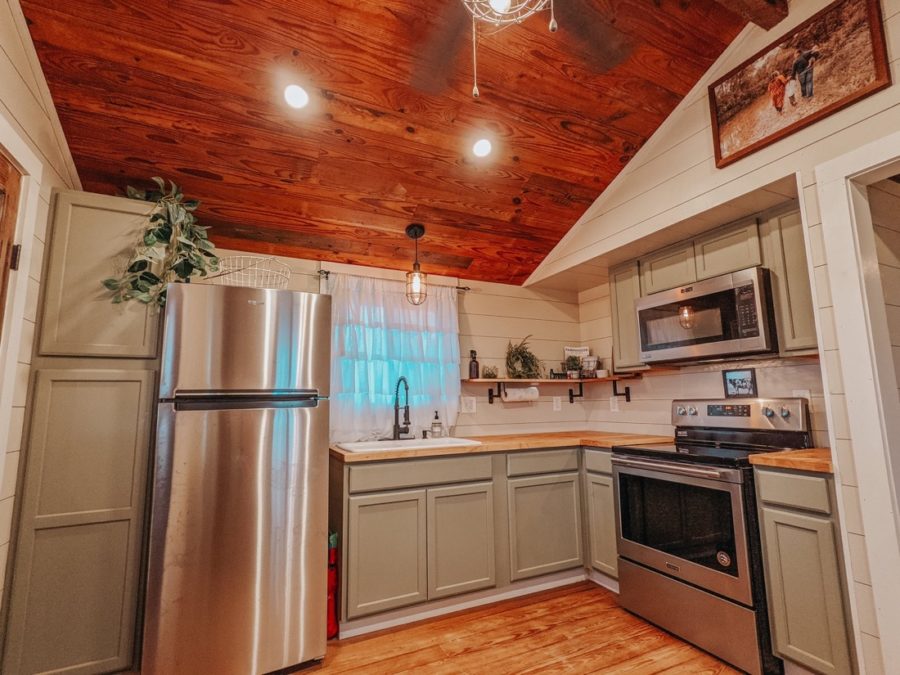
Once the walls were framed, insulated, and wired, the cottage began to look like a home. Drywall went up, creating smooth surfaces ready for paint. The farmhouse aesthetic Katy envisioned started to emerge: white or light-colored walls to maximize natural light, simple trim and moldings, and an overall sense of clean, unpretentious charm. Farmhouse style works particularly well in small spaces because it emphasizes function over ornamentation. You’re not adding unnecessary decorative elements that would clutter the space — instead, every design choice serves a purpose. Open shelving in the kitchen, for example, is both practical (easy to access dishes and pantry items) and visually appealing (creates a sense of openness rather than closing off the room with upper cabinets). The result is a space that feels larger than its square footage and more welcoming than many conventional homes twice its size.

Images © Katy Zientek

Images © Katy Zientek

Images © Katy Zientek
Images © Katy Zientek
Images © Katy Zientek
Teamwork Makes the Build Possible
While Katy and Michael did the majority of the construction work themselves, they weren’t entirely alone. Friends showed up on weekends to help with framing, drywall, and other tasks that go faster with extra hands. This is one of the hidden advantages of DIY builds: they create opportunities for community. When you’re willing to tackle a project this ambitious, people want to be part of it. Some help because they’re curious and want to learn. Others help because they believe in what you’re doing and want to support you. And a few help because they know that one day they might attempt something similar and they’re banking goodwill for when it’s their turn. The couple also hired a professional contractor to build the covered porch, acknowledging that this was beyond their skill level and worth paying for expert work. That willingness to recognize your limits and bring in help where needed is a mark of smart project management, not weakness.

Images © Katy Zientek
Images © Katy Zientek
Images © Katy Zientek
The Remarkable Transformation: Before and After
The before-and-after comparison is dramatic. What started as a bare shed with concrete floors and unfinished walls became a cozy, charming farmhouse cottage with a distinct personality and character. The transformation took approximately nine months from start to finish — a timeline that’s realistic for DIYers working evenings and weekends while juggling jobs and family responsibilities. Nine months is also significant because it’s long enough to learn skills, make mistakes, course-correct, and grow as builders. By the end of the project, Katy and Michael had developed carpentry skills, electrical knowledge, plumbing basics, and project management experience they didn’t have at the beginning. Those skills are permanent assets that will serve them for the rest of their lives, whether they’re building another structure, making home repairs, or simply understanding how buildings work.
Images © Katy Zientek
Images © Katy Zientek

Images © Katy Zientek

Images © Katy Zientek
A $15,000 Path to Homeownership
The original budget was $10,000. Like most construction projects, the final tally came in higher — around $15,000 in materials. That’s a 50% budget overrun, which sounds significant, but context matters. Even at $15,000, this is far less than a down payment on a traditional home, far less than a year’s worth of rent, and far less than what most tiny house builders spend. The budget didn’t include the cost of the shed itself (they already owned it), nor did it include the value of their labor (which was substantial). But as a pure materials cost for creating a livable 280-square-foot dwelling, $15,000 is remarkably affordable. For the couple, this investment meant the end of seven years of renting and the beginning of homeownership. Their plan is strategic: live in the cottage while saving money and building a larger permanent home on the same property. Once the larger home is complete, the cottage can be converted into an Airbnb rental, generating income and paying back the initial investment many times over. This isn’t just about tiny living — it’s about building financial security and creating options.
Images © Katy Zientek

Images © Katy Zientek
Images © Katy Zientek
Images © Katy Zientek
Home Sweet Farmhouse Cottage
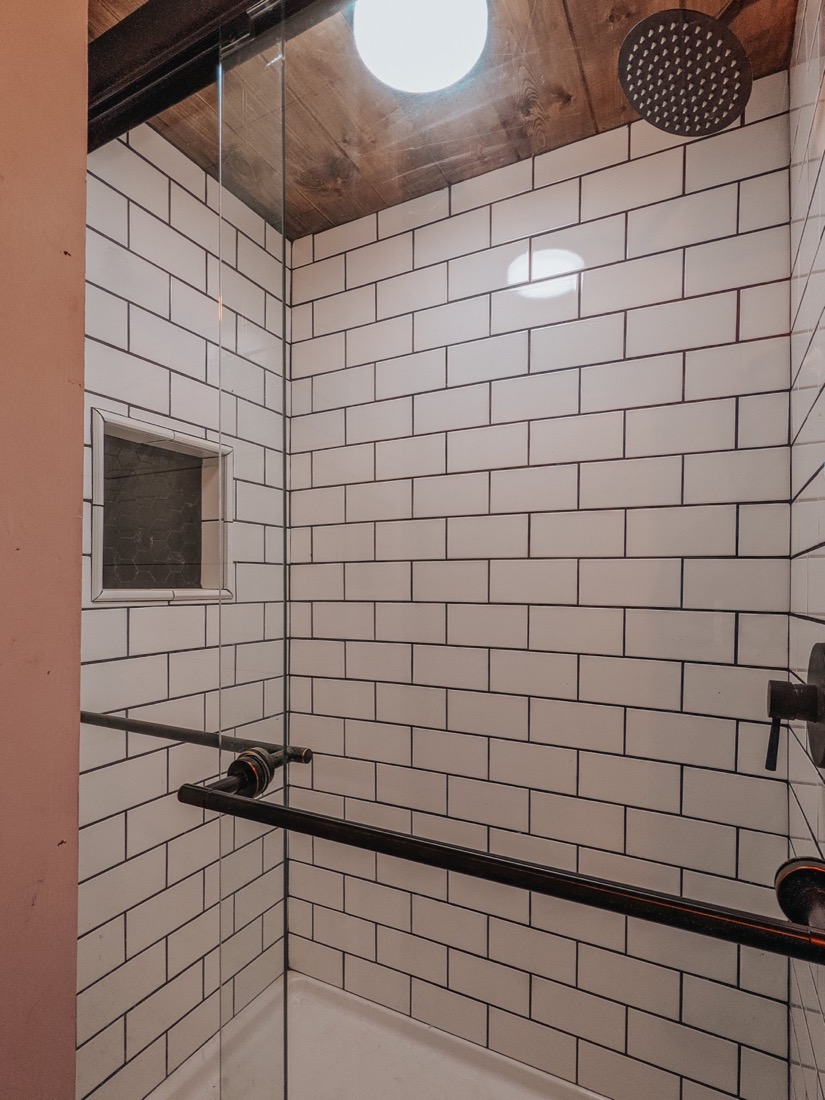
The finished cottage is warm, inviting, and surprisingly spacious for 280 square feet. The downstairs bedroom provides privacy, the kitchen is fully functional with a range, sink, and refrigerator, and the open living area connects seamlessly to the covered porch. The bathroom includes a full shower, sink, and toilet. Every element serves a purpose, and nothing feels cramped or makeshift. This is a real home — not a temporary shelter, not a glorified camping setup, but a place where a family of four can live comfortably while they plan their next chapter. The farmhouse aesthetic ties everything together: simple finishes, light colors, functional furniture, and a few well-chosen decorative touches that make the space feel personal without overwhelming it. It’s proof that with careful planning, hard work, and a willingness to learn, you can create a home that reflects your values and meets your needs without going into debt or waiting years to save enough money.
Images © Katy Zientek
Images © Katy Zientek

Images © Katy Zientek

Images © Katy Zientek

Images © Katy Zientek
Images © Katy Zientek

Images © Katy Zientek
Design Details
- Size: 280 square feet (converted shed)
- Location: Round Top, Texas
- Builders: Katy and Michael Zientek (DIY, with help from friends and one hired contractor for the porch)
- Build timeline: Approximately 9 months (September 2020 to May 2021)
- Total material cost: Approximately $15,000 (original budget was $10,000)
- Layout: Downstairs bedroom, kitchen, open-plan living area, bathroom
- Exterior: Covered front porch with extended outdoor living space
- Style: Farmhouse cottage aesthetic with light colors and functional furnishings
- Family: Couple with two young daughters
- Systems: Full plumbing, electrical, insulation for year-round comfort
- Future plans: Live in cottage while building larger home, then potentially convert to Airbnb
Lessons from This Shed Conversion
- Starting with an existing structure dramatically reduces costs. No foundation, exterior framing, or roof construction needed from scratch — you’re starting miles ahead of a ground-up build.
- Proper insulation is critical when converting an uninsulated shed. Without it, the space will be uncomfortable or uninhabitable in extreme temperatures, no matter how nice the finishes are.
- Adding covered outdoor space is essential for tiny living with a family. The porch effectively doubles the usable square footage by creating a weather-protected zone for play, relaxation, and overflow activities.
- You don’t have to do it all yourself. The couple enlisted friends for weekend help and hired a contractor for the porch. Knowing when to ask for help or pay for expertise is smart project management.
- Budget overruns are normal, but the result is still far cheaper than traditional housing. They went from $10K to $15K (a 50% increase), but even at $15K, this is an incredibly affordable path to homeownership.
- Nine months is a realistic timeline for a DIY shed conversion while working other jobs. This isn’t a weekend project, but it’s also not a multi-year odyssey. With consistent weekend work, it’s achievable in less than a year.
- Having a long-term plan makes the investment even smarter. Live here, build larger, then Airbnb — this isn’t just about tiny living, it’s about building wealth and creating income streams.
- Building as a family creates memories and teaches children valuable skills. The kids watched, learned, and became part of the story. That’s an education money can’t buy.
Learn More
Highlights
- Family of four transforms an ordinary shed into a 280 sq ft farmhouse cottage
- Located in Round Top, Texas
- Total material cost of approximately $15,000 (budget originally $10,000)
- Nine-month build timeline with mostly DIY labor and weekend help from friends
- Features a downstairs bedroom, full kitchen, open living area, bathroom, and covered front porch
- The couple did most of the work themselves, hiring a contractor only for the porch construction
- After seven years of renting, the family finally owns their own home
- Future plans include building a larger home and converting the cottage into an Airbnb rental
- Farmhouse aesthetic with light colors, simple finishes, and functional design
- Proper insulation, plumbing, and electrical systems make it a year-round dwelling
- An inspiring example of how shed conversions offer an accessible path to homeownership
Which aspect of this shed conversion inspires you most — the budget-friendly approach, the family teamwork, or the long-term Airbnb plan? If you had a shed to convert, what would be your biggest concern? Share your thoughts in the comments below.
Related Stories:
- Family Turns Shed Into Their $15,000 Tiny Home + Interview
- $15k Barn Shed Tiny House
- Barn/Shed Tiny House Conversion
- Debt-free With A Shed Turned Tiny House
More Like This:
This post may contain affiliate links and/or sponsored content.
Alex
Latest posts by Alex (see all)
- Storybook Cedar Tiny House on Wheels for Sale in Texas - July 7, 2026
- Creekfront Tiny Home for Sale in the Acony Bell Community, NC - July 7, 2026
- Best Tiny Homes Under $75K: 6 Affordable Builds You Can Buy Right Now - July 7, 2026
muy linda remodelacion, falto el plano del antes y despues para ver como quedo la transformaciòn del lugar,saludos.
Hay un segundo artículo para detalles de antes.
I have two questions.
1) What are the dimensions of your tiny house?
2) Where you are located in Texas, are there any minimum square footage requirements?
Your home is beautiful. What makes it more special is that you built it mostly by yourselves.
It’s 14×20, not counting the porch which adds another 8 feet… They’re in Fayetteville, Texas…
What a great job! The porch is awesome.
A porch adds so much to a tiny house!
I agree…you just extended the house with that porch..now let’s screen it in! Job well done.
Some great ideas…I’m glad the family took a look at the shed and went hmmm. Also that they kept the floor plan simple, but finished with higher quality materials and better appliances. Nice work, folks!
I love the results of their considerable sweat equity! Very cozy and warm! Hard to believe they only spent $15,000 because it looks more expensive. They should write a book on how to stretch your tiny house budget! I like it all but I do have one question that I have in many of the tiny homes I see and that is why did they not use a corner kitchen cabinet with a carousel to add valuable storage? If you don’t use a corner cabinet, there is dead space in that corner. Maybe people get good deals on cabinets that don’t include a corner base cabinet. I’m not admonishing but merely expressing my being puzzled. The bottom line is that they did a fabulous job!
Well, carousels aren’t the only way to make use of a corner space. There’s other options to accessing hard to reach spaces, some of which will make more use of the space than a carousel would…
However, not everyone finds that actually useful or will always have a place in the budget. There’s also other ways to make use of hard to reach spaces, like putting the water heater there…
While these days, with the supply chain issues, it’s also possible the hardware was simply not available and a DIY may not be an option to everyone…
What a lovely, happy house! Highest praises to this family. A polite suggestion: do consider adding railings around the porch, as no one wants to see someone fall and get hurt. This comment is respectfully submitted.
Stephan of Arkansas
They actually have added railings around the porch already… Weren’t actually done when the article was published…
Excellent! How is it, James D., that U have access to photos of a house that are not seen in the article? U commented in another article that a THOW parking facility had more trees than seen in the article’s accompanying photos, which also was welcome news. I’ve often wondered if U are a member of the TinyHouseTalk staff. U are most knowledgeable and informed. Kind regards from Arkansas.
You can say I help out, mainly as a bit of a researcher and I’m good at finding things out… The family has an Instagram page, it’s been changed from the link in the article but just add (dot)tinyliving at the end to make it work… They’ve posted updated photos, including some video clips…
Judging from their posts, the railings were installed between 24-27 weeks ago, DIY as they got tired waiting for the ones they ordered to come in… and they’re fully moved in and living in the home. So more decoration, kids toys, etc. to be seen in the updated photos…
Thanks James for your research and thorough responses!
Article link has been updated, works now to go directly to the family’s Instagram page…
I feel like I missed something in reading the article- they had been renters for several years, but there was an unused shed they had their eye on… was this shed on the land they were renting?
Link works to go to their Instagram page, they do answer questions posted there…
Beautiful great job and in the end paid off. Where do those little girls sleep? I would’ve made a lot area cut out 2 feet of that huge bathroom, and you could’ve done a Murphy bunk bed for them in that extra large bathroom. There could’ve been a loft space above mom and dads bed or say mom and dad in loft and girls below. There was enough pitch to the roof to lend for a loft. Ok I don’t live there and it has been a year would love to see if you all made any changes in this last year. Its beautiful, its paid off, and you guys worked you butts off and have a home great job
I would have made the shower stall smaller to gain space in more important places. I just don’t understand the need or want for a large shower stall. The idea here is tiny. Tiny is about small and necessary. I must, however, commend them on having a well placed t.v. that isn’t the size of a drive-in theater screen.