This post contains affiliate links.
Have you ever thought about building a steel-framed tiny house? That’s what Kim and Jay Merrett are doing.
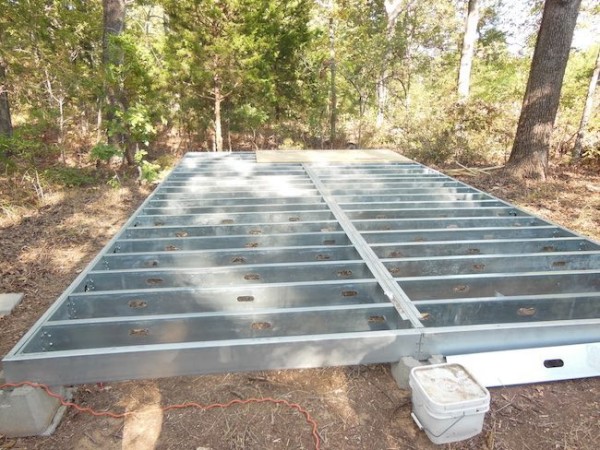
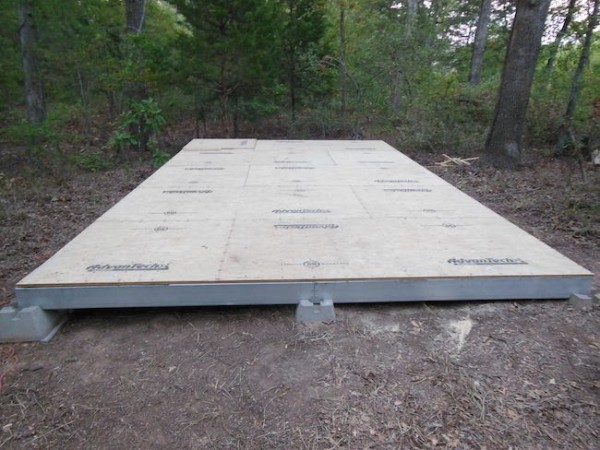
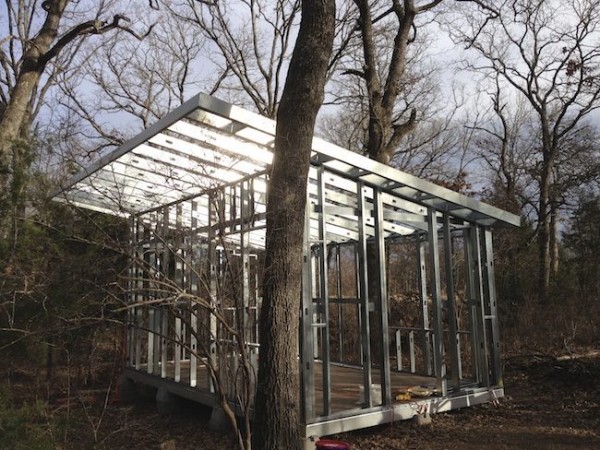
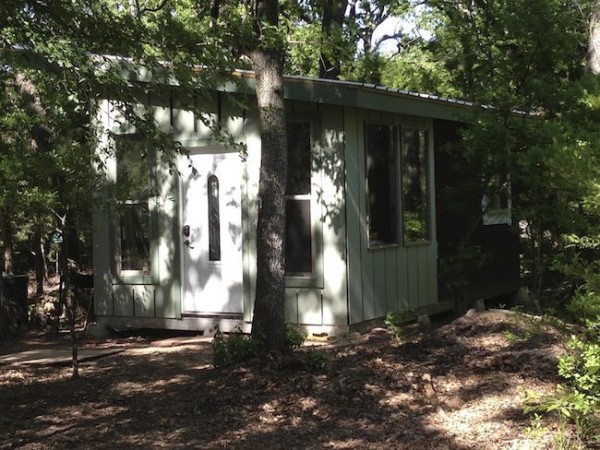
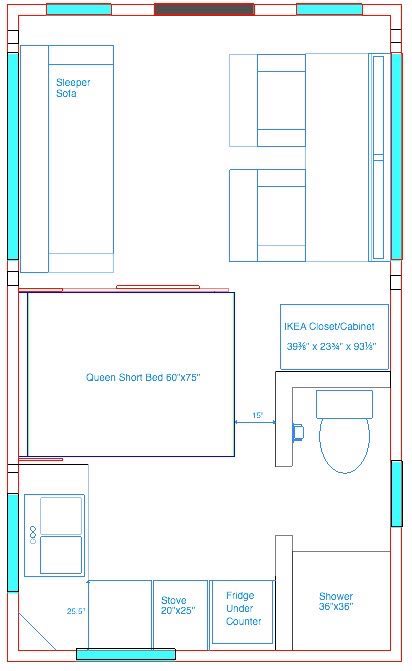
I’m happy to show you their 240 sq. ft. 12′ x 20′ steel framed tiny house in the woods. You can see how they built it below. They’re still working on the interior. Pretty soon they will have a peaceful tiny cabin to enjoy for years to come. You can see their floor plan design below too.
I hope you enjoy looking at it and learning about it below. Would you consider building with steel instead of wood? Let us know your thoughts in the comments. Finally you can help us spread the word about it with the re-share buttons down at the bottom of this article.
Building a Steel Framed Tiny House in the Woods
Images © Jay & Kim Merrett
Images © Jay & Kim Merrett
Learn more at their blog: Dreams By the Acre
Resources
If you enjoyed this steel-framed tiny house in the woods you’ll absolutely LOVE our free daily tiny house newsletter with even more! Thank you!
This post contains affiliate links.
Alex
Latest posts by Alex (see all)
- Her 333 sq. ft. Apartment Transformation - April 24, 2024
- Escape eBoho eZ Plus Tiny House for $39,975 - April 9, 2024
- Shannon’s Tiny Hilltop Hideaway in Cottontown, Tennessee - April 7, 2024



I was involved in building an addition using steel on one of the bedrooms to minimize thermal bridging. But incorrectly isolated studs perform worse than wood. http://web.ornl.gov/sci/roofs+walls/research/detailed_papers/steel_frame/index.html
Another problem with the steel. As the material heats and cools it “pops”. Sometimes this becomes annoying (while the sun is coming up and warming the structure).
I think someone who really knows what they’re doing can build a quality structure. Sadly it is not me (us). And I’m not making any judgement of this article or builder.
Thanks, Leo. So far so good. We’ve been staying in the building for about a year as we work on it and no noises so far. 🙂 We’ll keep our fingers crossed. We had some good advise from some people in the steel construction industry advising us so I’m hoping it will be trouble free for a very long time. Steel took a while to get used to but I really like working with it now!
Nice job. This is amazing because I’m considering doing something very similar but possibly with aluminium – more expensive but no rust! Do you have any information on the foundations? Cant seem to find any more on their excellent blog which is very informative and particularly helpful to me.
Thanks! As long as they are out of the weather, I haven’t seen any issue with the steel rusting unless you are along a coastline where the salt content in the air is high. You’ll still get rust (oxidation) on the aluminum but maybe not as quickly as with steel. I don’t really have a lot of data either way. The foundation blocks we got from our local hardware center. They’re pretty common here in the states. About $6 each. If your ground is solid, they’re a good solution for buildings this size and weight. If there’s any settling, you can just jack the building up and add a brick at a time to bring it up. I did put in earth anchors and tied those to the frame to ensure it doesn’t come off the piers. Good luck with your project!
http://www.homedepot.com/p/Headwaters-12-in-x-8-in-x-12-in-Concrete-Patio-Pier-Block-PIERBLOCK/204230166
With one exception, I really like the floor plan, especially the bed on the first floor. The bathroom is adequate and the kitchen is quite well done. Here’s my one suggestion: I would put a wall bed in place of the permanent one, and have a drop down dining table on its underside so that when it’s up, you can have the table down for additional kitchen counter space as well as eating. That will also open up the space to one big room, and eliminate the need for the separate table and chairs opposite the sofa. What do you think?
If you go to their blog you’ll see that they have some very good Murphy bed plans lined up. Very clever use of space.
Thanks, Kathy. We just aren’t up to climbing up and down a loft at our age to find the bathroom in the middle of the night. Thus the bed on ground floor. 🙂 There are multiple configurations on the blog that show the tables and bed open and closed. The table on the murphy bed cabinet opens in 2 leafs to allow us to have a bistro sized for just the two of us or open fully for 4. When the murphy bed cabinet is open, you can lower the table in front of the sofa to work or dine in there. The cabinet behind the chairs in the living area will house a TV on an actuator that raises and lowers the TV into the cabinet. I had the surface space there so I decided to add the table onto that cabinet just to be flexible. If you want to sit in a chair directly in front of the windows, you can that way. We’ve also decided to get a larger fridge than the under counter that’s pictured in the plans. The fold out dining table there in the kitchen area more than makes up for the lost counter space. Thanks for the comments and interest. I get a bit long winded in the blog but there is also a photo gallery now in the archives which walk through the whole process if you’d like to check it out. A number of things I would do differently in hind sight but we’re happy so far. We’ve got 12 acres to play on. If we get rested after this build, maybe we’ll start on another and this could be the guest cottage.
Wow, you HAVE thought of it all then! I don’t know how I missed that there was a link to your blog with more photos – normally I jump on that! FYI a I put your great house on my “My Favorite Tiny Houses” Pinterest board. I have literally thousands of tiny living pins on 16 boards, and believe me I don’t pin just everything I see! I really love yours!
Thanks, Kathy! Too kind. Stay warm and safe.
This is going to be worth all their hard work. They are going to have people begging them to build these.
I would like to see the inside when it is finished. The plywood should have been run length wise to tie the floor joists together.
Thanks! We finished the drywall this weekend and are working on the kitchen area next. Hopefully, we will have it close to completion by this summer. I got a bit carried away on the foundation as this was my 1st building to construct. We put floor joists on 12″ centers so each sheet of ¾” decking connects at least 5 joists. We also put a 2nd layer of decking sandwiched on top of that with the sheets turned opposite of the layer below. They are also cross strapped and tied to the center beam to avoid any racking. Floorplan accommodates 9 people for dinner. Luckily, I won’t have to worry about their pant sizes or their appetites! 🙂
It’s a nice design but I would have built the subfloor out of wood. That exposed thin steel sub will rust quickly and repairs will be difficult. The remainder of the design is very well done.
Steel is not as thin as it may look. Most of the structural is 16 gauge galvanized. I was inspired by a model home builder that built the frame of a house and left it open for potential builders to see how it was put together. It’s been sitting out in the weather for 7-8 years and not a spot of rust yet. Exposed wood left out that long would have to be replaced. Part of the reason we used steel in the first place. Since we were buying materials as we could afford it, we weren’t sure how long it would take to get dried in. As it was, it took about 9 months. Thanks for comments!
Doesn’t come close to being well designed. Sorry
I far prefer the 290sq ft Brazilian condo earlier in this post.
While the exterior is terriffic, the interior looks like it’s been designed by a novice.
Sharon, You are correct we are very novice at this. We started building for two reasons (1) to learn, and we have certainly done that. (2) this was going to be a storage/cabin while we built a home. Somewhere along the way we became very comfortable with the size and decided to work with what we had done already. Would we have designed it differently – sure. Are we unhappy with what we are doing – no. Thank you for your comments. Each to his own. Have a great day.
Yes I like the Brazilian also. No argument there. We already had windows and a door installed with other uses in mind for the building. It wasn’t meant to be full time living at the time. Moving them around to make more of a plan like the Brazilian would have been costly and incredibly time consuming. We are still thinking of building another one with what we have learned on this this. This still is not a bad guest house.
yes great job well done
Thanks, Joe! Are you considering a Tiny House or are you already living in one?