This post contains affiliate links.
Mark singlehandedly built this DIY tiny house on a tight budget, and used mostly reclaimed and secondhand materials to furnish the interior.
The entire home cost $30K CAD (~$24K USD) to build, and that includes the cost of a new custom trailer, new lumber, and the rent he paid for a building space.
He and his girlfriend lived in the tiny home for a year and a half in Stouffville, Ontario (near Toronto) at an RV park where they legally parked their tiny house year round and spent approximately $300/month on rent and $100/month on utilities.
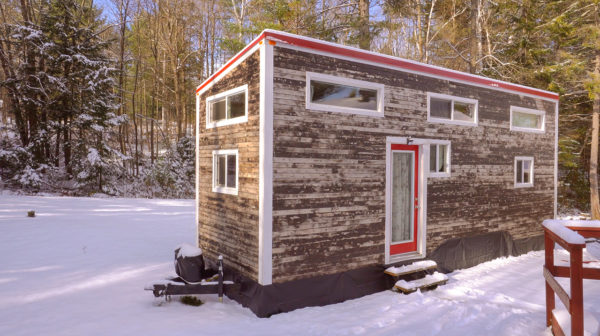
Image © Exploring Alternatives
To keep building costs down, Mark and his girlfriend did their best to source secondhand furniture and appliances by shopping on Kijiji (Canada’s Craigslist). The fridge, stove, sink, kitchen cabinets, countertops, cork flooring, and more, were all bought used.
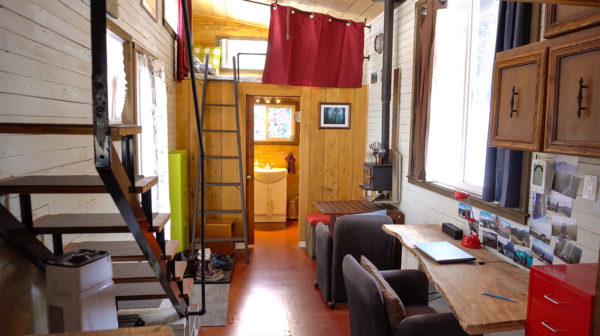
Image © Exploring Alternatives
For water, they can use an insulated hose in the winter where it’s currently parked, but at the RV park where they were first located, they had to store water indoors in a rainwater barrel and water tank.
For heat they use a Cubic Mini wood stove and they also have an electric infrared heater with a thermostat that turns on at night, or when they’re away, so that the temperature inside doesn’t drop below freezing.
They did have some issues with humidity in the kitchen (under the fridge) because they built the tiny house directly on the metal frame, which creates spaces where there’s a big temperature difference. To combat moisture they have a fan that runs in the kitchen to help circulate hot air and dehumidify the space.

Image © Exploring Alternatives
Check out the video below for a full tour of Mark’s budget tiny house!
VIDEO: Young Man Builds $24K Tiny House + Winter Living Experience & Tour
Additional Resources:
This post contains affiliate links.


While using a single walled pipe, even for a small section, can let more heat into the space, it also poses issues as you’ll require more clearance around the pipe and that heat release means the exhaust is getting cooled and that can lead to increased build up of creosote and require more regular cleaning of the pipe or you’ll run into long term safety issues.
The Cubic Mini is a secondary burn type wood burning stove, which makes it pretty efficient, but its small size still means it’s not as easy for it to reach optimal temperatures and it’s harder to have enough wood in it to last the whole night while you sleep.
So more ideal to add some mass around it to help store the heat it gives off to help it last longer than to try to simply heat the space faster.
The company now requires any buyers to install a double wall pipe all of the way up. The problem is the creosote. If the pipe is hot enough, the creosote isn’t a problem. However if a single wall pipe is used, the pipe itself is much cooler and the creosote hardens in the pipe. As the Cubic Mini pipe is only 3″ wide, it would have to be cleaned pretty much every week.
It is impossible to get it to run the whole night. It just isn’t big enough. Our families wood stove is almost 2′ by 2′ and the wood in that, at the lowest air intake just gives us a few coals in the morning.
very nice, well done.
Mark, kudos for a job wel done I think you’ve created a great home for yourself and you’re girlfriend for a great budget. you may be able to fix the moisture problem if you can lift the structure ever so slightly from the frame and slip a foam or felt seal between the two, even plastic might help you want a moisture barrier in there of some sort but I realize that this may be difficult. Do what you can though since it will follow you forever and rot the wood on the frame.
We are just starting our build this spring also in BC. and are looking forward to the process! ours will be a bit bigger at 54’long x 11’6″ wide that not counting the roof overhang. mind you I do have a fair bit of woodworking experience since I was a Furniture builder in a previous life!
If you move back to BC I’ll keep an eye out for that uniquely yours Tiny
Home, Congrats…..