This post contains affiliate links.
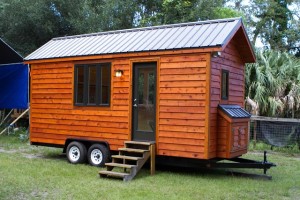
In this video-based post, you’re going to learn the basics of how to floor and frame a Tumbleweed tiny house on a trailer. In this video, they are building the Fencl tiny house using an 18′ trailer. The design shown here is 130 square feet without including the upstairs sleeping loft and the tiny front porch area.
Designed by Jay Shafer, the original designer at Tumbleweed Houses (today he’s at Four Lights). his video (below) is going to show you the basics of flooring and framing a tiny house on wheels.
Please don’t miss other exciting tiny homes – join our FREE Tiny House Newsletter!
How to Build a THOW (Tiny House on Wheels)

Photo Credit Tumbleweed Houses/YouTube
The steps outlined below are assuming that you have already decided on a design (either your own or set of plans) and are therefore ready to buy a trailer.
How to Floor and Frame a Tumbleweed Tiny House on a Trailer
Step 1. Buy your trailer, materials, and order your windows
Step 2. Remove any vertical pieces from the trailer (except wheel wells) so you have room to floor and frame traditionally
Step 3. Remove decking then leave 20″-24″ of gaps in-between
Step 4. Install aluminum flashing to protect from water and rodents (if you have a porch, don’t do this there because you don’t want water to just sit there when it rains, it needs to go through)
Step 5. Start your floor framing. Front and back first then fill gap. Use screws instead of nails.
Step 6. Insulate!
These step by step instructions were written with what I learned from Jay Shafer’s the Small House Book and by attending workshops. Both of which I highly recommend if, like me, you were new to construction or the idea of building on tiny and/or on wheels.
This book also covers the rest of the step by step details for framing your walls, roofing, installing a house wrap, windows, and much more. Highly recommend it!
Video on Flooring and Framing on a Trailer thanks to Tumbleweed Houses
Andrew Odom Instructs and Demonstrates how to Frame for a Tiny Home on Wheels
You can always consider attending a tiny house workshops to learn more about building and to meet some other really cool people who also like smaller homes because of the freedom they offer.
For a list of this years workshops click here.
If you enjoyed this post on how to floor and frame a Tumbleweed tiny house on wheels, “Like” and share using the buttons below and then- if you want- talk about it in the comments below. Thanks!
Try our Free Daily Tiny House Newsletter for even more!
You can also join our Small House Newsletter!
Also, try our Tiny Houses For Sale Newsletter! Thank you!
More Like This: Tiny Houses | Tumbleweed Tiny Home on Wheels: The New American Dream? | THOW
This post contains affiliate links.
Alex
Latest posts by Alex (see all)
- Escape eBoho eZ Plus Tiny House for $39,975 - April 9, 2024
- Shannon’s Tiny Hilltop Hideaway in Cottontown, Tennessee - April 7, 2024
- Winnebago Revel Community: A Guide to Forums and Groups - March 25, 2024


If you park your house on a lot, how do you connect to water? Do I need to get in touch with a plummer and have a cement slab laid down to kind of make this a semi permanent home location. I live in northern WI. so this will have to work in the winter time too. Coooold weather proof. Thank you for your time and help. I have no idea about this end of the plumbing.
In the high Sierras of California I worked for my father in a home maintenance business, the way we usually handled the plumbing was to have the water main come up out of the ground under the house. The main had a hole about 1-1/2 feet in diameter and 2 or 3 deep (depending on the depth of the frost line in the area) in the ground around the pipe. The pipe was then wrapped with an electric plumbing heat tape from the bottom of the hole all the way up to where the pipe entered the house, and if possible a foot or so into the house if the pipe is accessible. The pipe was then wrapped with insulation and the hole in the ground was filled with fiberglass insulation. The main water valve was at the bottom of the hole and had a square steel rod that extended up to ground level that could be turned with a wrench. Most houses had a skirting around the foundation or at least a 2′ wood box that had a door built around the water main from ground level up to where it entered the house to keep the wind and snow out.
Steve is right,
You can also build an insulated box where the line comes up.
Some folks put a light bulb in for heat,others use heat tape.
Where is your pressure tank for your water in these tiny houses?
Are you in an RV park where you have temp connections?
If you are on your own lot,own well,you need a pressure tank setup,
Same question for electric hookup.Temp or like a mobile home permanent,individual.
Why doesn’t anyone build the joists into the trailer frame with the subfloor lying directly on top of the trailer? Is there a drawback that I’m not considering?
I see what you are getting at 4 more inches of head room. I think it is done to have a way to put floor insulation in , crawling under the trailer and trying to insulate would be a problem ! Now if you could attach the deck and had a way to turn the trailer over to frame in for insulation and then seal with metal, I think maybe you are seeing why it is done this way. A lot less trouble……….
Does anyone know how to build the subfloor into the bed of the trailer, not on top of it? Or does anyone know of any resources that show a beginner how to do so?
Any suggestions appreciated!
Thanks,
Erin
good luky my man
stay cool
Interesting watching the two videos.
Looks like in one video they’re using screws and the other they’re using nails. I’ve looked into articles about which one to use for building a tiny house and while a majority of what I found favored using nails, it looks like one could go either way when building their house. I’ve been thinking of building with ol’ fashioned hammer and nails. Can’t afford to buy a nail gun and no place nearby rents them out. Oh well.
Lots of research left to go. 🙂
Search craiglist for a nail gun, we also found some at the pawn shop…it will cut your time in HALF.
good clear instructions In my system i don’t have any framing but use insulated plywood panels using 9mm ply for the inside and outside panels , 50mm styrene foam and 3 length of 2 x 2 pine of 2300 long glued and nailed together ( extremely strong and made on a jig in about 30 minutes per panel )
I love this concept and ideal for life.
Screws………what kind of screws for the framing.
Thanks, Don
THANK GOD FOR MUTE BUTTONS! This is almost the worst video on this subject that I’ve seen. You might know what you’re doing, but you’re extremely poor at explaining it. That’s probably why you’ve only gotten a dozen comments in five years. PASS!